
This example demonstrates how to send multiple values from the MSP430 LaunchPad to the computer. The readings from three potentiometers are used to set the red, green, and blue components of the background color of a Processing sketch.
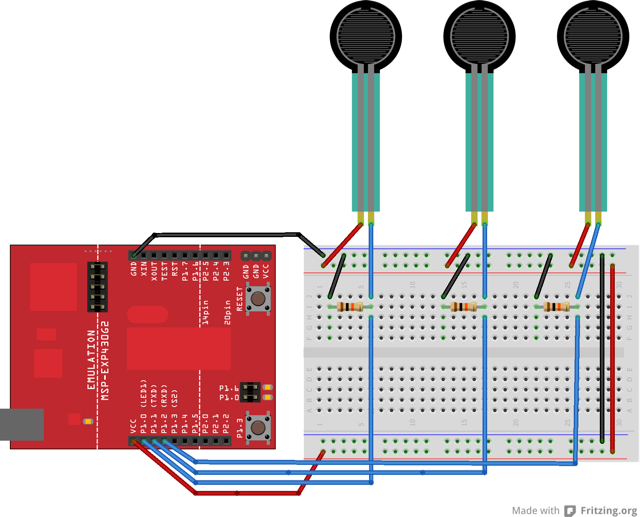
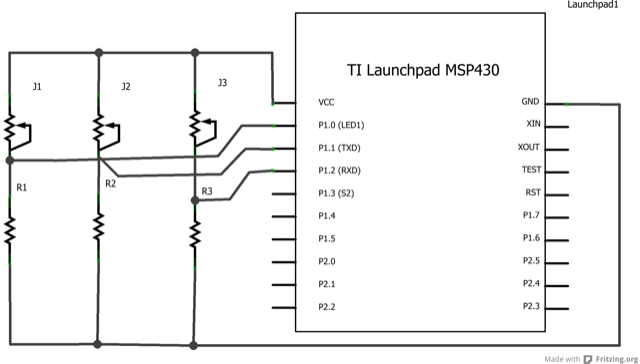
MSP-EXP430G2 LaunchPad
Three potentiometers
Three 10K ohm resistors
Breadboard
Hook-up wire
The sensor values are sent from the LaunchPad to the computer as ASCII-encoded decimal numbers. This means that each number is sent using the ASCII characters "0" through "9". For the value "234" for example, three bytes are sent: ASCII "2" (binary value 50), ASCII "3" (binary value 51), and ASCII "4" (binary value 52).
Connect analog sensors to analog input pins A0, A1, and A2. This circuit uses three voltage divider sub-circuits to generate analog voltages from the force-sensing resistors. A voltage divider has two resistors in series, dividing the voltage proportionally to their values.
Energia
The Energia code is straightforward for the most part. We first initialize our variables named redPin, greenPin, and bluePin to read the analog sensor attached to the specific pin. The setup() section begins the Serial communication. The loop() section we display the values from the analog signal on the Serial Monitor. We can check to see if the analog sensors are sending signals to the LaunchPad.
Processing
In Processing, the code generates a window that will change color according to the values set from the analog sensors. Each analog sensor is tied to a Red, Green, or Blue color and when the sensors are changed, the three colors are mixed together and the output of the sensor values will change the color on the Processing window.
/*
  This example reads three analog sensors (potentiometers are easiest)
  and sends their values serially. The Processing code at the bottom
  take those three values and use them to change the background color of the screen.

  The circuit:
  * potentiometers attached to analog inputs 0, 1, and 2


  created 2 Dec 2006
  by David A. Mellis
  modified 30 Aug 2011
  by Tom Igoe and Scott Fitzgerald
  modified 16 April 2013
  by Sean Alvarado

  This example code is in the public domain.
*/

const int redPin = A0;  // sensor to control red color
const int greenPin = A1; // sensor to control green color
const int bluePin = A2; // sensor to control blue color

void setup()
{
  Serial.begin(9600);
}

void loop()
{
  Serial.print(analogRead(redPin));
  Serial.print(",");
  Serial.print(analogRead(greenPin));
  Serial.print(",");
  Serial.println(analogRead(bluePin));
}

/* Processing code for this example

// This example code is in the public domain.

import processing.serial.*;

float redValue = 0; // red value
float greenValue = 0; // green value
float blueValue = 0; // blue value

Serial myPort;

void setup() {
  size(200, 200);

  // List all the available serial ports
  println(Serial.list());

  // Open whatever port is the one you're using with the LaunchPad
  myPort = new Serial(this, Serial.list()[0], 9600);

  // don't generate a serialEvent() unless you get a newline character:
  myPort.bufferUntil('\n');
}

void draw() {
  // set the background color with the color values:
  background(redValue, greenValue, blueValue);
}

void serialEvent(Serial myPort) {
  // get the ASCII string:
  String inString = myPort.readStringUntil('\n');

  if (inString != null) {
    // trim off any whitespace:
    inString = trim(inString);
    // split the string on the commas and convert the
	// resulting substrings into an integer array:
	float[] colors = float(split(inString, ","));
	// if the array has at least three elements, you know
	// you got the whole thing. Put the numbers in the
	// color variables:
	if (colors.length >=3) {
	  // map them to the range 0-255:
	  redValue = map(colors[0], 0, 1023, 0, 255);
	  greenValue = map(colors[1], 0, 1023, 0, 255);
	  blueValue = map(colors[2], 0, 1023, 0, 255);
    }
  }
}
*/
Dimmer:move the mouse to change the brightness of an LED.
Graph:send data to the computer and graph it in Processing.
Serial Call Response:send multiple variables using a call and response (handshaking) method.
Serial Call and Response ASCII:send multiple vairables using a call-and-response (handshaking) method, and ASCII-encoding the values before sending.
Serial Input (Switch (case) Statement):how to take different actions based on characters received by the serial port.
Corrections, suggestions, and new documentation are very welcomed. They can be contributed to the energia website repository on Github.
The text of the Energia getting started and reference guides are licensed under a Creative Commons Attribution-ShareAlike 3.0 License. The Energia reference is based on the Wiring/Arduino reference. Code samples in the guide are released into the public domain.
Energia sketches are C/C++ based and compiled with the open-source compiler MSPGCC or arm-gcc-none-eabi. The Energia language comes from Wiring. The Energia environment is based on Processing and includes modifications made by Wiring and Arduino.
© Energia