
Learn how to use a transistor to help us spin a small DC motor.
This example requires a LaunchPad with 5V pin or an external power supply. If you do not have the required hardware or you are having difficulty and need to test your transistor you can try Example 08B.
Hardware Required
TI LaunchPad
Breadboard BoosterPack
Breadboard
DC Motor
2x Transistor (2N2222)
Diode (1N4004)
330 ohm resistor (optional)
100nF ceramic capacitor (optional)
5x Jumper Wires
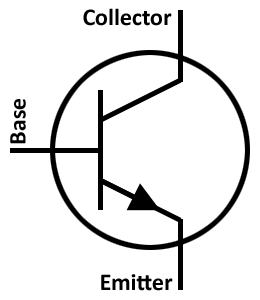
A microcontroller can be very useful for controlling small things like LEDs and measuring analog data but when it comes to things that might draw a lot of power, such as spinning a motor, it needs some extra help. One useful component we can add is a transistor. A transistor is an electronic switch that makes it possible for a low voltage DC signal like the GPIO pins on the LaunchPad to control a higher voltage signal. Transistors can be NPN or PNP, which designates the source of current. NPN (sinking) needs current and PNP (sourcing) supplies current. The transistors included in the Sidekick are NPN. There are three pins on a basic NPN transistor: the emitter, the base, and the collector. The collector will collect current from a power source, so this means it will be connected to VCC of the higher voltage circuit. The emitter is emitting the electricity when the circuit is shorted so it will be connected to GND. The base is the pin that will control the switch and this will be hooked up to your signal pin on the LaunchPad. For extra protection, you can use a resistor between the base and the LaunchPad pin, just like an LED. Below is a labeled diagram of how a transistor is typically drawn in a schematic.
There is usually some math required to figure out what kind of resistor you need for the voltage you want to use. This math is based off of Ohm’s Law that says voltage in a circuit is equal to current times resistance (V=IR). For the example, you won’t need to worry about the calculations, but if you wanted to build your own circuit you may need to run through calculations to find the proper values for the components to work.
We will also use a component called a diode. You are already familiar with a diode because an LED is a diode. This means that electricity can only flow in one direction. If you plug an LED the wrong way, it won’t light up. The same principle applies to a standard diode, but in this case we want to protect our circuit from flyback, which is a sudden spike in voltage. When you have an inductive load in your circuit like a motor, there might be some spike in voltage when power is removed, so we want to protect our electronics with a flyback diode to prevent unexpected results. You also have the option of using a capacitor in parallel with the diode if you wish. A capacitor stores energy and this can also be useful for added protection or smoother performance in a system.
The transistor is a tool that we can use to help spin a motor but a better way to spin motors is to use a purpose built motor driver. You can use these to change the direction of the spinning and have much better control over the spinning. Check out the advanced examples to learn more about alternative ways to build a motor circuit. CAUTION: The transistor can get VERY hot when powered on or connected incorrectly. Do not touch or yank the transistor until it is cool to the touch. There is a chance that you can burn out your transistor, so make sure you set up the circuit exactly as shown.
Before we setup our motor control circuit controlled by our code, let’s make sure our motor can spin with just power. The easiest test is to connect your motor (carefully thread the 2 jumper wires into the motor terminals) and connect one wire to GND and the other wire to 5V. Your motor should immediately start spinning! As long as the motor has the correct power, it will spin in the direction of the current. If you flip 5V and GND it will spin the other direction. If the motor does not get enough power to turn the shaft, it will stall and not spin. Normally with any kind of electrical connection, we want to be very careful when directly powering things, but since we are only using low power electronics with the LaunchPad (3.3V and 5V) you won’t have much danger of improper handling or electrical shock. If working with higher voltage electronics, the danger of electrical shock goes up and extra caution must be taken to ensure safety. If you want to try hooking it up to the 3.3V rail, you should see the motor does not spin. This is because the motor needs more voltage. Making sure your components match your voltage range is very important when building circuits.
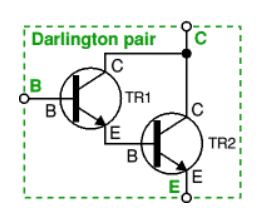
Next you can build the circuit. The LaunchPad pins do not supply a lot of current (only about ~20mA). So if we want to turn the motor, we will need to use a Darlington pair. This means we need two transistors which will work together to drive more current than a transistor working by itself. Put another way, in a Darlington pair the current of the first transistor is amplified by the second transistor. The pair behaves like a single transistor with a very high current gain so that only a tiny base current is required to make the pair switch on. You can make your own Darlington pair from two ordinary transistors. TR1 can be a low power type but TR2 may need to be high power. The maximum collector current Ic(max) for the pair is the same as Ic(max) for TR2.
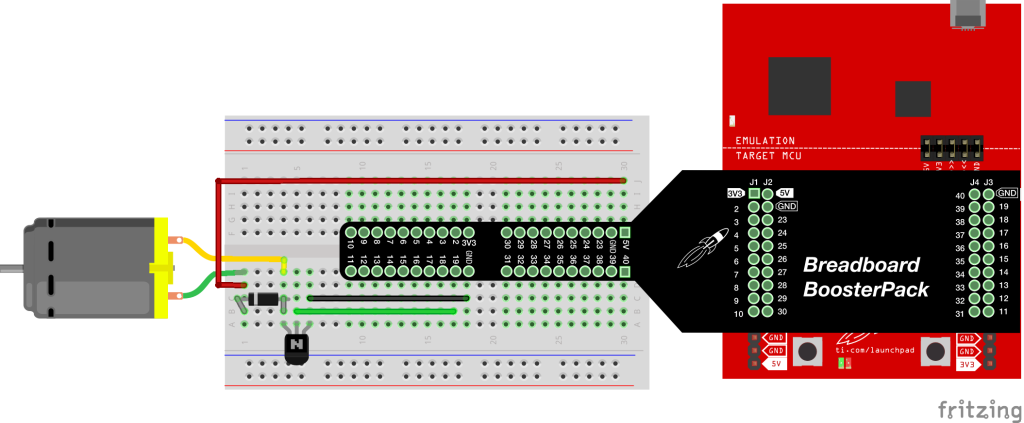
If we were to try to build a circuit with just one transistor, we won’t have enough current to drive the motor, so the motor will stall by rotating a little and then stopping repeatedly. The following circuit with one transistor will not properly spin the motor with the LaunchPad.
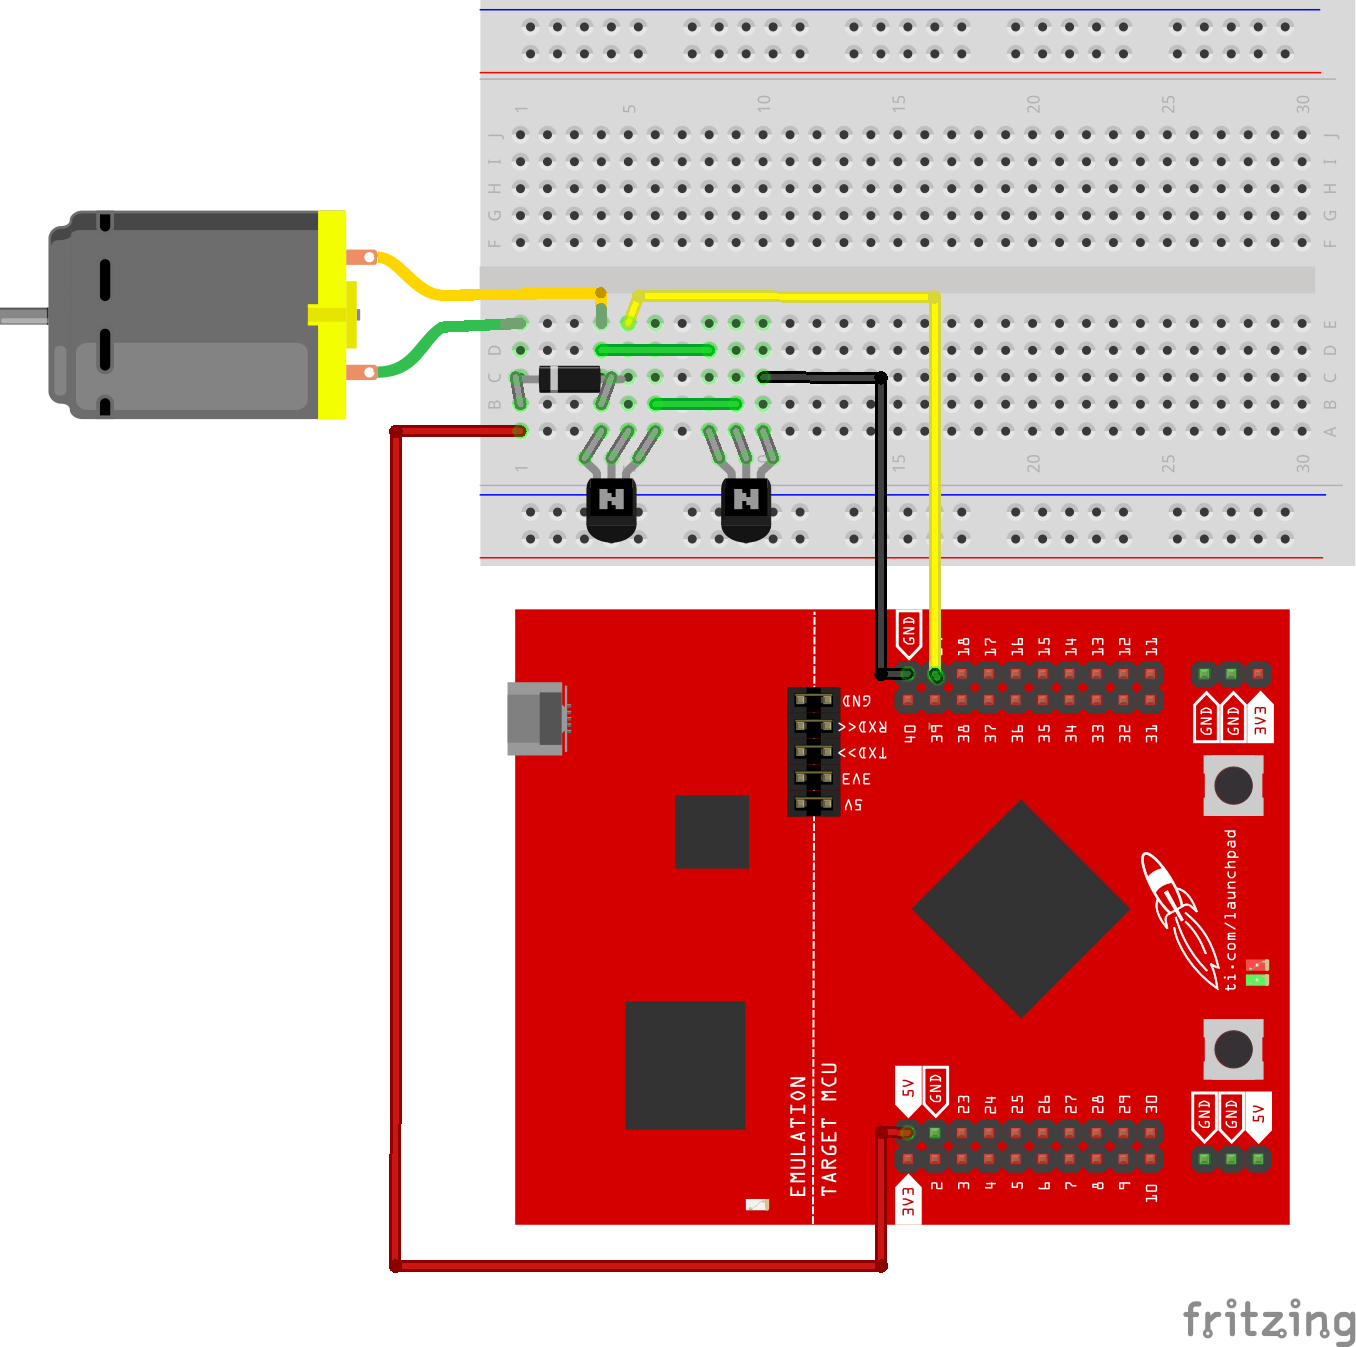
Please refer to the circuit below for the correct way to setup a Darligton pair.
Note: There are different types of transistors that ship with the Sidekick. If you use the LP395, the current drawn by the motor to spin up will exceed the 100mA current limiter. Therefore it will not work. If you use just an LED however, it works perfectly. Therefore we need to use our 2N2222 transistor for our motor circuit. You will need 2x 2N2222 transistors for your motor to spin properly. Some kits include the LP395 transistor. If you are in a class or workshop, you can partner up with another person to do this exercise and share the two 2N2222 transistors. If you are solo, you can acquire another transistor or you can watch the example video and move on to the next exercise. Motor control is actually very complicated than we make it look, but this is a basic example to get you started. A better way to spin a motor is to use a proper motor driver like in this advanced example. Controlling motors is a great way to make automatic machines that can help perform physical jobs. Circuit & Schematic
With Breadboard BoosterPack
With LaunchPad
/*
  Example 08: Spin the Motor (Transistor)
  Sidekick Basic Kit for TI LaunchPad

  We will use the motor in this circuit and learn how to
  master a transistor to help us control different voltages.


  Hardware Required:
  * TI LaunchPad
  * Breadboard BoosterPack
  * Breadboard
  * DC Motor
  * 2x Transistor (2N2222)
  * Diode (1N4004)
  * 100 nF capacitor (optional
  * 330 ohm resistor (optional)
  * 5x Jumper Wires

  This example code is in the public domain.
*/

// pick any digitalWrite() capable pin for the motor control
int motorPin = 19;

/* In the setup function set your motor pin as output.
 * Write it low to start.
 */
void setup()
{
  pinMode(motorPin, OUTPUT);
  digitalWrite(motorPin, LOW);
}

/* In the loop section you can set the on time and
 * off time of the motor (1 second on, 2 seconds off)
 * and just write HIGH or LOW ot the motor pin.
 */
void loop()
{
  int onTime = 3000; // time the motor is on
  int offTime = 2000; // time the motor is off
  digitalWrite(motorPin, HIGH);
  delay(onTime);
  digitalWrite(motorPin, LOW);
  delay(offTime);
}Can you change the speed of the motor?
Code not uploading?
Check for errors in Energia debug window. The compiler will tell you what is happening. Errors are in red text.
Sometimes your LaunchPad gets stuck or hung up on the previous code. Unplug your LaunchPad and plug it back in to perform a full reset. This is called a power on reset. Sometimes using the RESET button can work but taking away the power and letting the microcontroller fully reset is often best.
If you have a failure to upload it could be your drivers are not properly installed. Energia will sometimes give the error "No unused FET Found" which means it can’t find a LaunchPad connected to your computer. Make sure you download the drivers for your operating system found on the Getting Started Guide.
If you had no problem with the previous Blink example, your Energia should be correctly set up. Restart your LaunchPad and restart Energia IDE if you encounter any problems. Make sure to select the right serial port and board type under the Tools menu.
Motor not spinning?
Make sure you properly uploaded the code and that you properly named your variables for the pins.
Your motor will probably need 5V or more to spin. If your LaunchPad does not have a 5V rail, you may need to hook up an external power supply like 4 AA or AAA batteries.
The motor may have too much current at the beginning so you may need to give the motor a kickstart with your finger to get it going. Some transistors can handle this better than others.
It’s possible you may have burned out your transistor by accident if you plugged it in wrong. Any NPN transistor can be used to make this circuit if you need to get a replacement. A common one is 2N2222 or the TIP31.
Try rebuilding the circuit from scratch and make sure your connections are correct.
If you’ve done all you can with no luck, move on to the next example. Motor control can be a tricky thing to debug.
Motor constantly spinning?
You may have plugged the transistor backwards. Turn it 180 degrees and see if it works. You should see the motor turn off and on.
For additional support, try searching the Energia forums on 43oh.com. We believe in you to figure out any problems, now believe in yourself and find the solution!
Corrections, suggestions, and new documentation are very welcomed. They can be contributed to the energia website repository on Github.
The text of the Energia getting started and reference guides are licensed under a Creative Commons Attribution-ShareAlike 3.0 License. The Energia reference is based on the Wiring/Arduino reference. Code samples in the guide are released into the public domain.
Energia sketches are C/C++ based and compiled with the open-source compiler MSPGCC or arm-gcc-none-eabi. The Energia language comes from Wiring. The Energia environment is based on Processing and includes modifications made by Wiring and Arduino.
© Energia