
Learn how to display numbers and letters using a 7 segment display.
TI LaunchPad
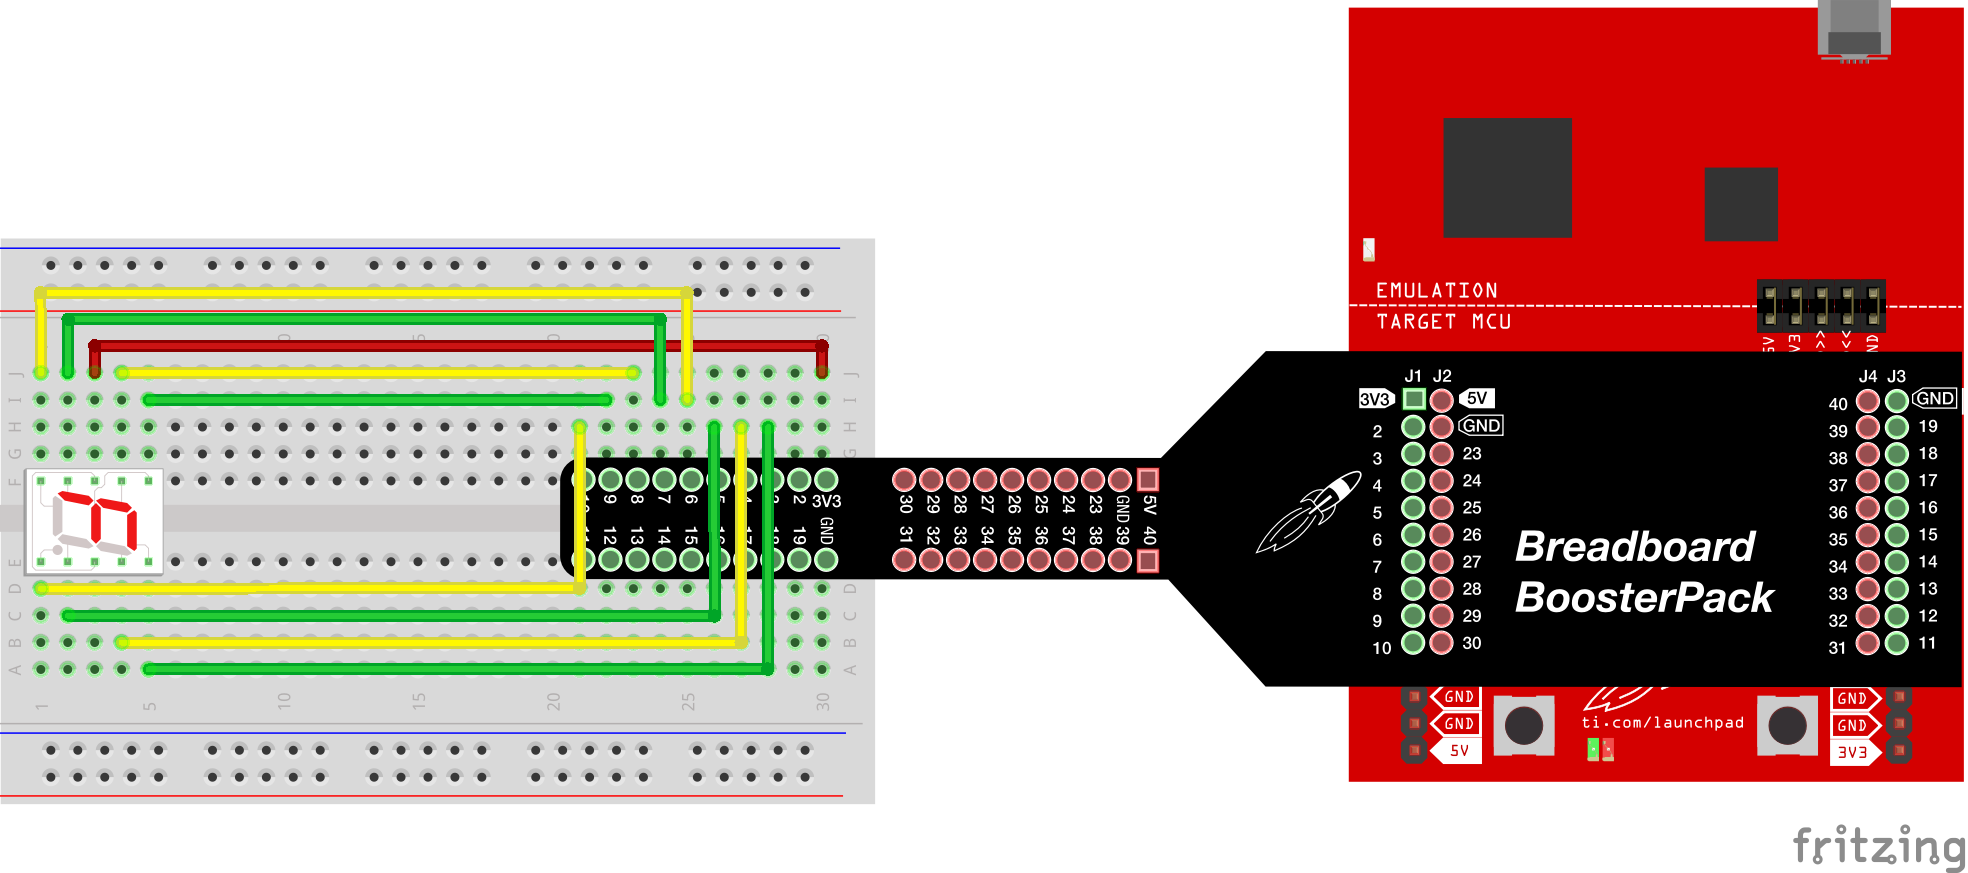
Breadboard BoosterPack
Breadboard
7 Segment Display
9x Jumper Wires
8x 330 ohm resistors (optional)
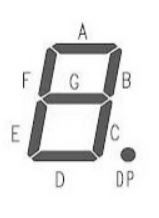
We will use a special LED array called a seven segment display to allow us to create numbers and letters. This is useful for giving us a visual display of something happening in the circuit. With this type of display we can show a number or letter. With more of these displays we could display a larger digit number or a word. The segments are normally labeled A-G as seen in the diagram below. We will use this orientation in our code.
By flipping segments on in a certain pattern, we can form visible numbers. Displaying human readable information is often an important feature of an electronic system. Electronics can deliver data that humans can then act upon.
This is the last basic example for the Sidekick. You have learned a lot about inputs, outputs, basic components, and controlling a system. You can continue with the advanced examples that may require additional components or you can review the Energia guide examples. If you did not complete the programming challenges for each exercise, you can go back and do them to improve your confidence with programming. To make more exciting projects, you can use BoosterPacks to add more capabilities to your LaunchPad. Circuit & Schematic
With Breadboard BoosterPack
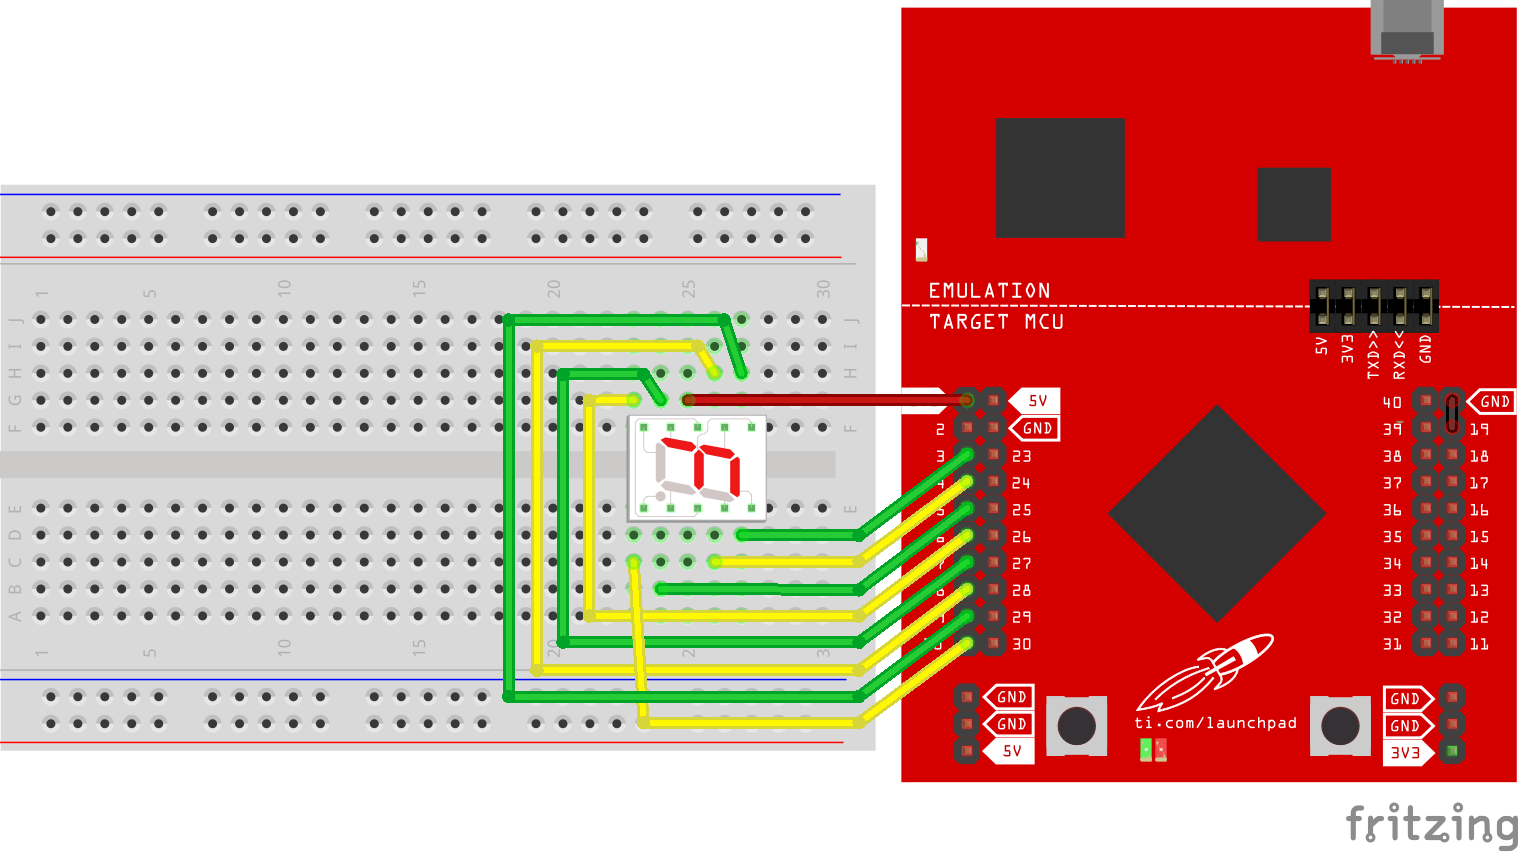
With LaunchPad
/*
  Example 10: 7 Segment Display (Digital Display)
  Sidekick Basic Kit for TI LaunchPad

  Here we will use a component that include 7 LEDs that are arranged
  in a grid so that we can form numbers and letters. This is one of the
  most basic types of displays, but have since been replaced by more
  popular LCDs (Liquid Crystal Displays), LED matrices,  and other display
  technologies.

  We will display the different numbers in a single digit countdown
  sequence.  It is also possible to form letters, but we will just cover
  numbers 0-9 in the example.

  Hardware Required:
  * TI LaunchPad
  * Breadboard BoosterPack
  * Breadboard
  * 7 Segment Display
  * 9x Jumper Wires
  * 8x 330 ohm resistors (optional)

  This example code is in the public domain.
*/

// Define the LED digit patterns for 0 - 9 in a 2 dimensional array.
// The 2D array (an array of arrays or a matrix) has 10 arrays that each
// contain 7 values.
// Note that these patterns are for common cathode displays. For common
// anode displays, change the 1's to 0's and 0's to 1's
// 1 = LED on, 0 = LED off, in this order:
// Common Anode version
byte seven_segment_digits[10][7] = { { 0,0,0,0,0,0,1 }, // display '0'
                                     { 1,0,0,1,1,1,1 }, // display '1'
                                     { 0,0,1,0,0,1,0 }, // display '2'
                                     { 0,0,0,0,1,1,0 }, // display '3'
                                     { 1,0,0,1,1,0,0 }, // display '4'
                                     { 0,1,0,0,1,0,0 }, // display '5'
                                     { 0,1,0,0,0,0,0 }, // display '6'
                                     { 0,0,0,1,1,1,1 }, // display '7'
                                     { 0,0,0,0,0,0,0 }, // display '8'
                                     { 0,0,0,1,1,0,0 }  // display '9'
                                   };

// Common Cathode version
/* byte seven_segment_digits[10][7] = { { 1,1,1,1,1,1,0 }, // display '0'
                                     { 0,1,1,0,0,0,0 }, // display '1'
                                     { 1,1,0,1,1,0,1 }, // display '2'
                                     { 1,1,1,1,0,0,1 }, // display '3'
                                     { 0,1,1,0,0,1,1 }, // display '4'
                                     { 1,0,1,1,0,1,1 }, // display '5'
                                     { 1,0,1,1,1,1,1 }, // display '6'
                                     { 1,1,1,0,0,0,0 }, // display '7'
                                     { 1,1,1,1,1,1,1 }, // display '8'
                                     { 1,1,1,0,0,1,1 }  // display '9'
                                   };
*/

/* Connect the pins of the display accordingly.
Only one of the VCC (Common Anode) / GND (Common Cathode) pins need to be
connected to work, but it's ok to connect both if you want.
///////////////TOP//////////////
   pin 1 : G (9)  pin 10: A (3)
   pin 2 : F (8)  pin 9 : B (4)
   pin 3 : VCC    pin 8 : VCC
   pin 4 : E (7)  pin 7 : C (5)
   pin 5 : D (6)  pin 6 : Dot (10)
/////////////BOTTOM/////////////
*/

/* In the setup function, we set our LED pins as OUTPUT.
 */
void setup() {

  pinMode(3, OUTPUT); // set segment A as output
  pinMode(4, OUTPUT); // set segment B as output
  pinMode(5, OUTPUT); // set segment C as output
  pinMode(6, OUTPUT); // set segment D as output
  pinMode(7, OUTPUT); // set segment E as output
  pinMode(8, OUTPUT); // set segment F as output
  pinMode(9, OUTPUT); // set segment G as output
  pinMode(10, OUTPUT); // set dot as output
  for(int i = 3; i < 10; i++) { // start with segments off
    digitalWrite(i, HIGH);
  }
  digitalWrite(10, HIGH);  // start with the dot off
}

/* In the loop section we will begin displaying the different numbers.
 * Add delay() or sleep() to give some time between the numbers changing.
 */
void loop() {
  for (int count = 10; count > 0; --count) {
    int pin = 3;
    for (int segCount = 0; segCount < 7; ++segCount) {
      digitalWrite(pin, seven_segment_digits[count-1][segCount]);
      ++pin;
    }
    delay(1000); // this is the same as delay() but saves power
  }
  delay(1000); // this is the same as delay() but saves power
}Can you display your name or a message on the segment display? Print out one letter at a time.
Code not uploading?
Check for errors in Energia debug window. The compiler will tell you what is happening. Errors are in red text.
Sometimes your LaunchPad gets stuck or hung up on the previous code. Unplug your LaunchPad and plug it back in to perform a full reset. This is called a power on reset. Sometimes using the RESET button can work but taking away the power and letting the microcontroller fully reset is often best.
If you have a failure to upload it could be your drivers are not properly installed. Energia will sometimes give the error "No unused FET Found" which means it can’t find a LaunchPad connected to your computer. Make sure you download the drivers for your operating system found on the Getting Started Guide.
If you had no problem with the previous Blink example, your Energia should be correctly set up. Restart your LaunchPad and restart Energia IDE if you encounter any problems. Make sure to select the right serial port and board type under the Tools menu.
Display not lighting up?
Make sure you properly uploaded the code and that you properly named your variables for the LED pins.
Make sure your pins are properly connected, if they are not the Segment Display will not light up properly. The VCC pin of the LED should be connected to the VCC pin of the LaunchPad.
For additional support, try searching the Energia forums on 43oh.com. We believe in you to figure out any problems, now believe in yourself and find the solution!
Corrections, suggestions, and new documentation are very welcomed. They can be contributed to the energia website repository on Github.
The text of the Energia getting started and reference guides are licensed under a Creative Commons Attribution-ShareAlike 3.0 License. The Energia reference is based on the Wiring/Arduino reference. Code samples in the guide are released into the public domain.
Energia sketches are C/C++ based and compiled with the open-source compiler MSPGCC or arm-gcc-none-eabi. The Energia language comes from Wiring. The Energia environment is based on Processing and includes modifications made by Wiring and Arduino.
© Energia