
Learn how to deal with basic inputs by turning on and off LEDs with push buttons.
TI LaunchPad
Breadboard BoosterPack
Breadboard
Red LED
Push Button
4x Jumper Wires
330 ohm resistor (optional)
10K ohm resistor (optional)
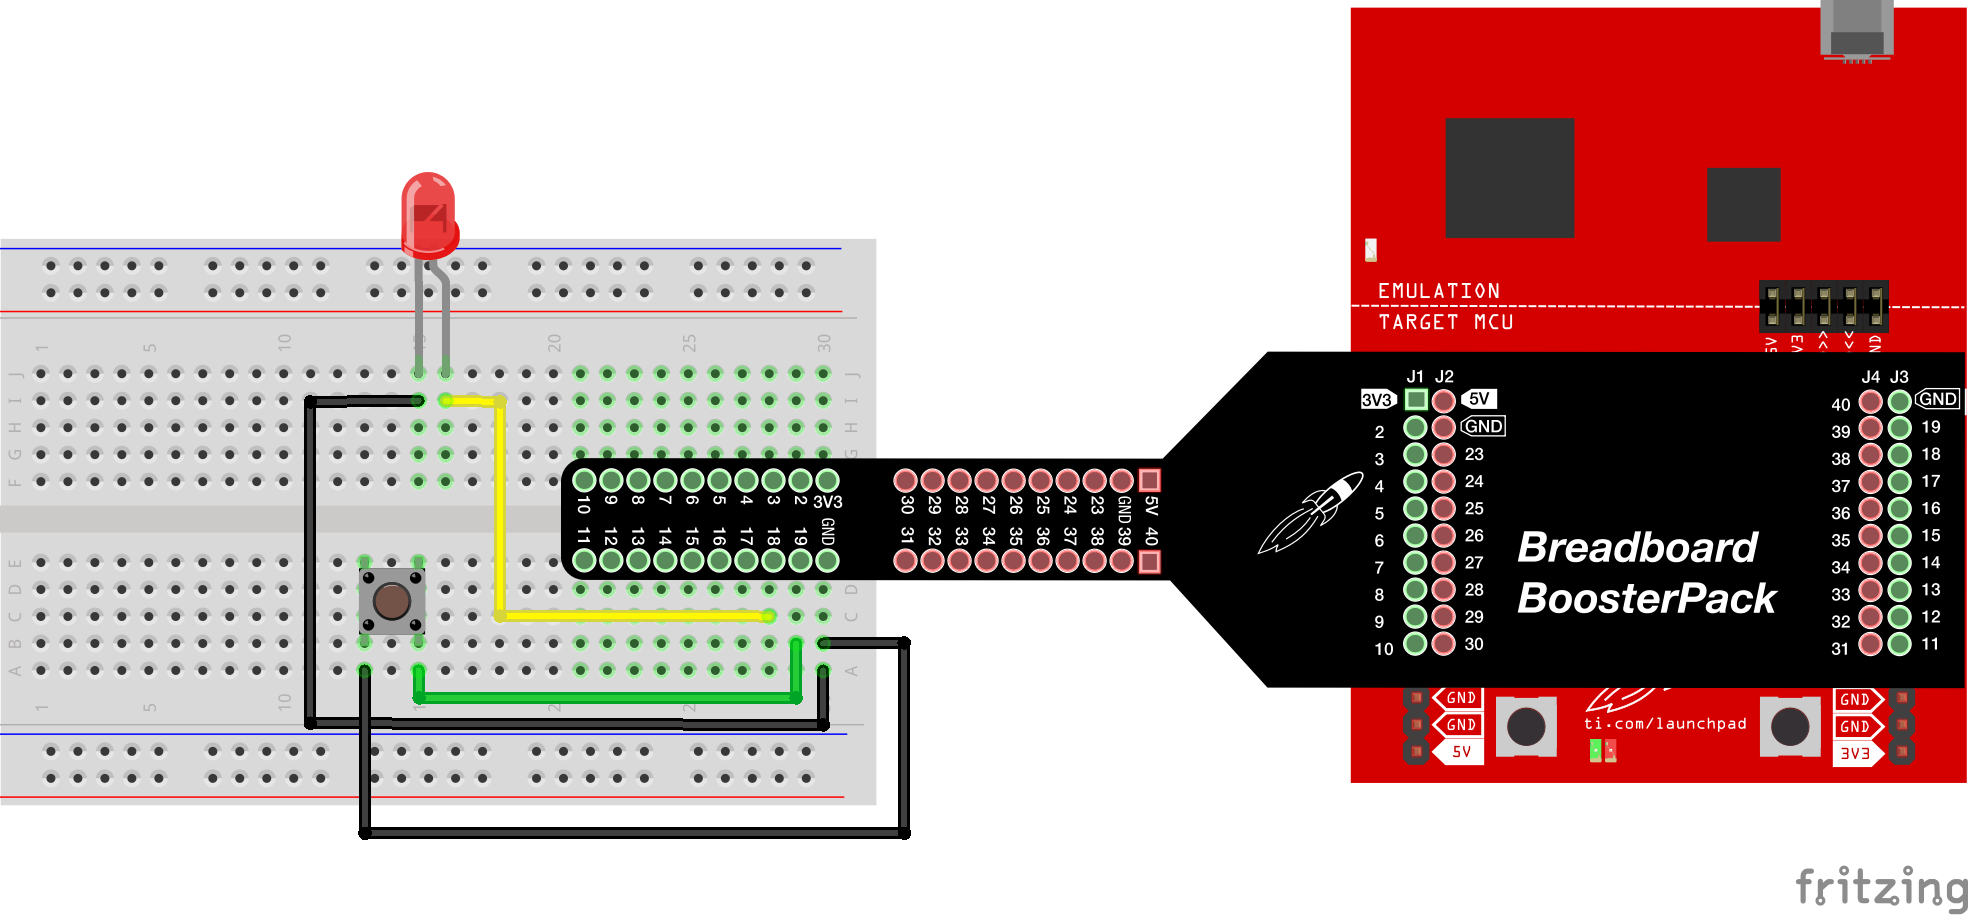
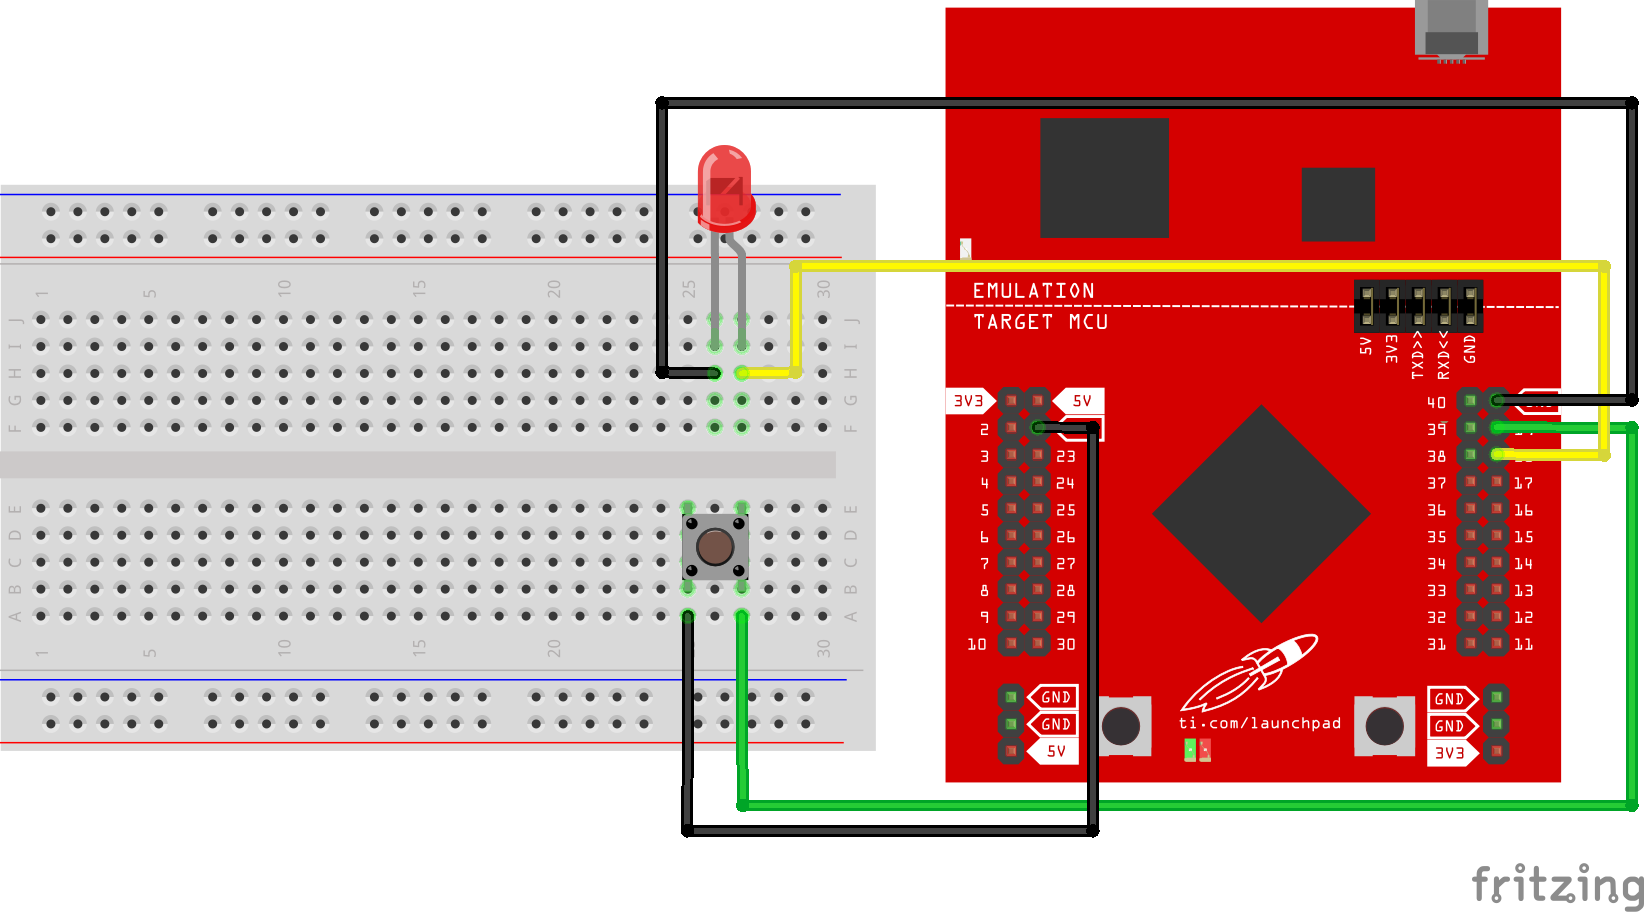
In this example we will explore inputs. A push button is an example of a physical input that can be used for controlling a circuit. We will be using the push button to turn on an LED. We can do this from the LaunchPad directly using the on board LED and button, but we can also build a small circuit to do the same thing. When you push the button with your finger you are completing the circuit, which allows electricity to pass through. When the button is released, the circuit is broken and electricity cannot pass through.
Push buttons or switches connect two points in a circuit when you press them. When the push button is open (unpressed) there is no connection between the two sides of legs on the push button, so if one leg of the push button is connected to VCC (through a pull-up resistor) the signal reads as HIGH, or 1. When the button is closed (pressed), it makes a connection between its two legs, connecting the button to ground, so that the button reads as LOW, or 0.
Your LaunchPad will usually have a pull up resistor on the pins which helps it more accurately detect the state of the button. If a pull up resistor is not present the microcontroller will get confused because the voltage on the pin will float (randomly change values) which makes it harder to detect a press. The pull up resistor makes the button work the opposite how we think it should: LOW or 0 when pressed, even though the circuit is getting completed and electricity is flowing when the button is pressed. Keep this in mind when writing your conditional statements for the button state logic.
A new concept to help a microcontroller make decisions is to use conditional statements in your code. The if() and else() statements help the microcontroller execute an instruction based on conditions. A great way to think of these statements is if you use the command in a sentence. For example "if _, do this, else_".
This code introduces us to the importance of the conditional statements in the code. In the example code, we can have the microcontroller make a decision based on parameters we establish in the code. The foundation of if/else statements will help us develop more sophisticated code that will execute specific functions if the conditions are met. Here it’s important to learn the syntax of the if/else statement.
When we use conditional statements we also need to know how to use comparison operators used for logical comparison. "==" will compare both sides of the equation and evaluate True if equal and False if not equal. "!=" will compare if both sides of the equation are not equal and evaluate True if not equal and False if equal. "<" is the less than operator and will evaluate True if the left side of the equation is lesser than the right side of the equation, False if otherwise. ">" is the greater than operator and will evaluate True if the left side of the equation is greater than the right side of the equation, False if otherwise. Circuit & Schematic
With Breadboard BoosterPack
With LaunchPad
Find the latest and greatest code example HERE on GitHub.
/*
  Example 02: Push Button (Input)
  Sidekick Basic Kit for TI LaunchPad

  >Basic Example
  Turns red LED on the LaunchPad on and off using the PUSH2 button.

  >Advanced Example
  Turns on and off a light emitting diode(LED) connected to digital
  pin 18, when pressing a push button attached to pin 19.

  Hardware Required:
  * TI LaunchPad
  * Breadboard BoosterPack
  * Breadboard
  * Red LED
  * Push Button
  * 4x Jumper Wires
  * 330 ohm resistor (optional)
  * 10K ohm resistor (optional)

   This example code is in the public domain.
 */

// constants won't change. They're used here to
// set pin numbers:
const int buttonPin = 19;     // the number of the pushbutton pin
const int ledPin =  18;      // the number of the LED pin

// variables will change:
int breadboardButtonState = 0; // variable for reading the BB button status
int launchpadButtonState = 0; // variable for reading the LP button state

/* In the setup we will set our LEDs to OUTPUT and our buttons
 * to INPUT_PULLUP
 */
void setup() {
  // initialize the breadboard LED pin as an output:
  pinMode(ledPin, OUTPUT);
  // initialize the onboard LED
  pinMode(RED_LED, OUTPUT);
  // initialize the breadboard push button pin as an input:
  pinMode(buttonPin, INPUT_PULLUP);
  // initialize the onboard pushbutton
  pinMode(PUSH2, INPUT_PULLUP);
}

/* In the loop section we going to get the state of the pin
 * using digitalRead() and save that to our variables
 * if the button is pressed we turn the LED on otherwise
 * the LED is off.
 */
void loop(){
  // read the state of the push button value:
  breadboardButtonState = digitalRead(buttonPin);
  launchpadButtonState = digitalRead(PUSH2);

  // check if the breadboard push button is pressed.
  // if it is, turn the breadboard LED state HIGH
  if (breadboardButtonState == 0) {
    digitalWrite(ledPin, HIGH); // turn LED on:
  }
  else {
    digitalWrite(ledPin, LOW); // turn LED off:
  }

  // check if the LaunchPad pushbutton is pressed.
  // if it is, turn the LaunchPad LED state HIGH
  if (launchpadButtonState == 0) {
    digitalWrite(RED_LED, HIGH); // turn LED on
  }
  else {
    digitalWrite(RED_LED, LOW); // turn LED off
  }
}Can you make the button a toggle for on/off (push it to stay on and push it again to turn off)? Can you change the brightness level of the LED with the button? Troubleshooting
Code not uploading?
Check for errors in Energia debug window. The compiler will tell you what is happening. Errors are in red text.
Sometimes your LaunchPad gets stuck or hung up on the previous code. Unplug your LaunchPad and plug it back in to perform a full reset. This is called a power on reset. Sometimes using the RESET button can work but taking away the power and letting the microcontroller fully reset is often best.
If you have a failure to upload it could be your drivers are not properly installed. Energia will sometimes give the error "No unused FET Found" which means it can’t find a LaunchPad connected to your computer. Make sure you download the drivers for your operating system found on the Getting Started Guide.
If you had no problem with the previous Blink example, your Energia should be correctly set up. Restart your LaunchPad and restart Energia IDE if you encounter any problems. Make sure to select the right serial port and board type under the Tools menu.
LED not lighting up?
Make sure you properly uploaded the code and that you properly named your variables for the LED pins. There is very little chance that your LED is broken, but we can verify by blinking a different LED with the same code.
Make sure your pins are properly connected, if they are not the LED will not light up properly. The GND pin of the LED should be connected to the GND pin of the LaunchPad.
LEDs only work in one direction, you may have to flip it to the other direction to work properly if you put it in backwards. Putting an LED backwards will not break it, so no need to worry.
Button not working?
Make sure your button is properly placed, it’s easy to have it turned the wrong direction since it is square. Turn it 90 degrees and see if that fixes your issue.
When connecting the legs to the LaunchPad you want to connect one side to GND and one side to a GPIO pin. Make sure they are opposite of each other, the easiest way to avoid mistakes is to connect the legs that are diagonal from each other.
For additional support, try searching the Energia forums on 43oh.com. We believe in you to figure out any problems, now believe in yourself and find the solution!
Corrections, suggestions, and new documentation are very welcomed. They can be contributed to the energia website repository on Github.
The text of the Energia getting started and reference guides are licensed under a Creative Commons Attribution-ShareAlike 3.0 License. The Energia reference is based on the Wiring/Arduino reference. Code samples in the guide are released into the public domain.
Energia sketches are C/C++ based and compiled with the open-source compiler MSPGCC or arm-gcc-none-eabi. The Energia language comes from Wiring. The Energia environment is based on Processing and includes modifications made by Wiring and Arduino.
© Energia