
Learn how to use a potentiometer for variable resistance.
TI LaunchPad
Breadboard BoosterPack
Breadboard
Potentiometer
5x Jumper Wires
Buzzer
In this example, we will turn on the LED and make a tone with the buzzer when the potentiometer is turned clockwise past a threshold, and we will turn off the LED and buzzer when the potentiometer is turned counter-clockwise past a threshold. The LED and buzzer give us a visual and audio indication of when the potentiometer has been rotated. The code to perform this function is shown below.
A potentiometer is a rotation sensor that is used for things like dials and knobs in electronic systems. They are simply mechanical resistors that changes resistance when given a tactile input. To the microcontroller, it sees the voltage change between 0 to VCC (3.3V) with the middle position being around 1.5-1.7V. To read the value of the potentiometer, we use the command analogRead(). The analogRead() function allows users to read the integer value of the selected pin (in our case, it will be set by the position of the potentiometer). The syntax to read the pin using the analogRead() function is: analogRead(pin). In the parenthesis, pin represents the name of the pin you want to read from. This will be the pin connected to the potentiometer in our example circuit. The analogRead() function will return a value between 0 and 1024, depending on the position of the potentiometer.
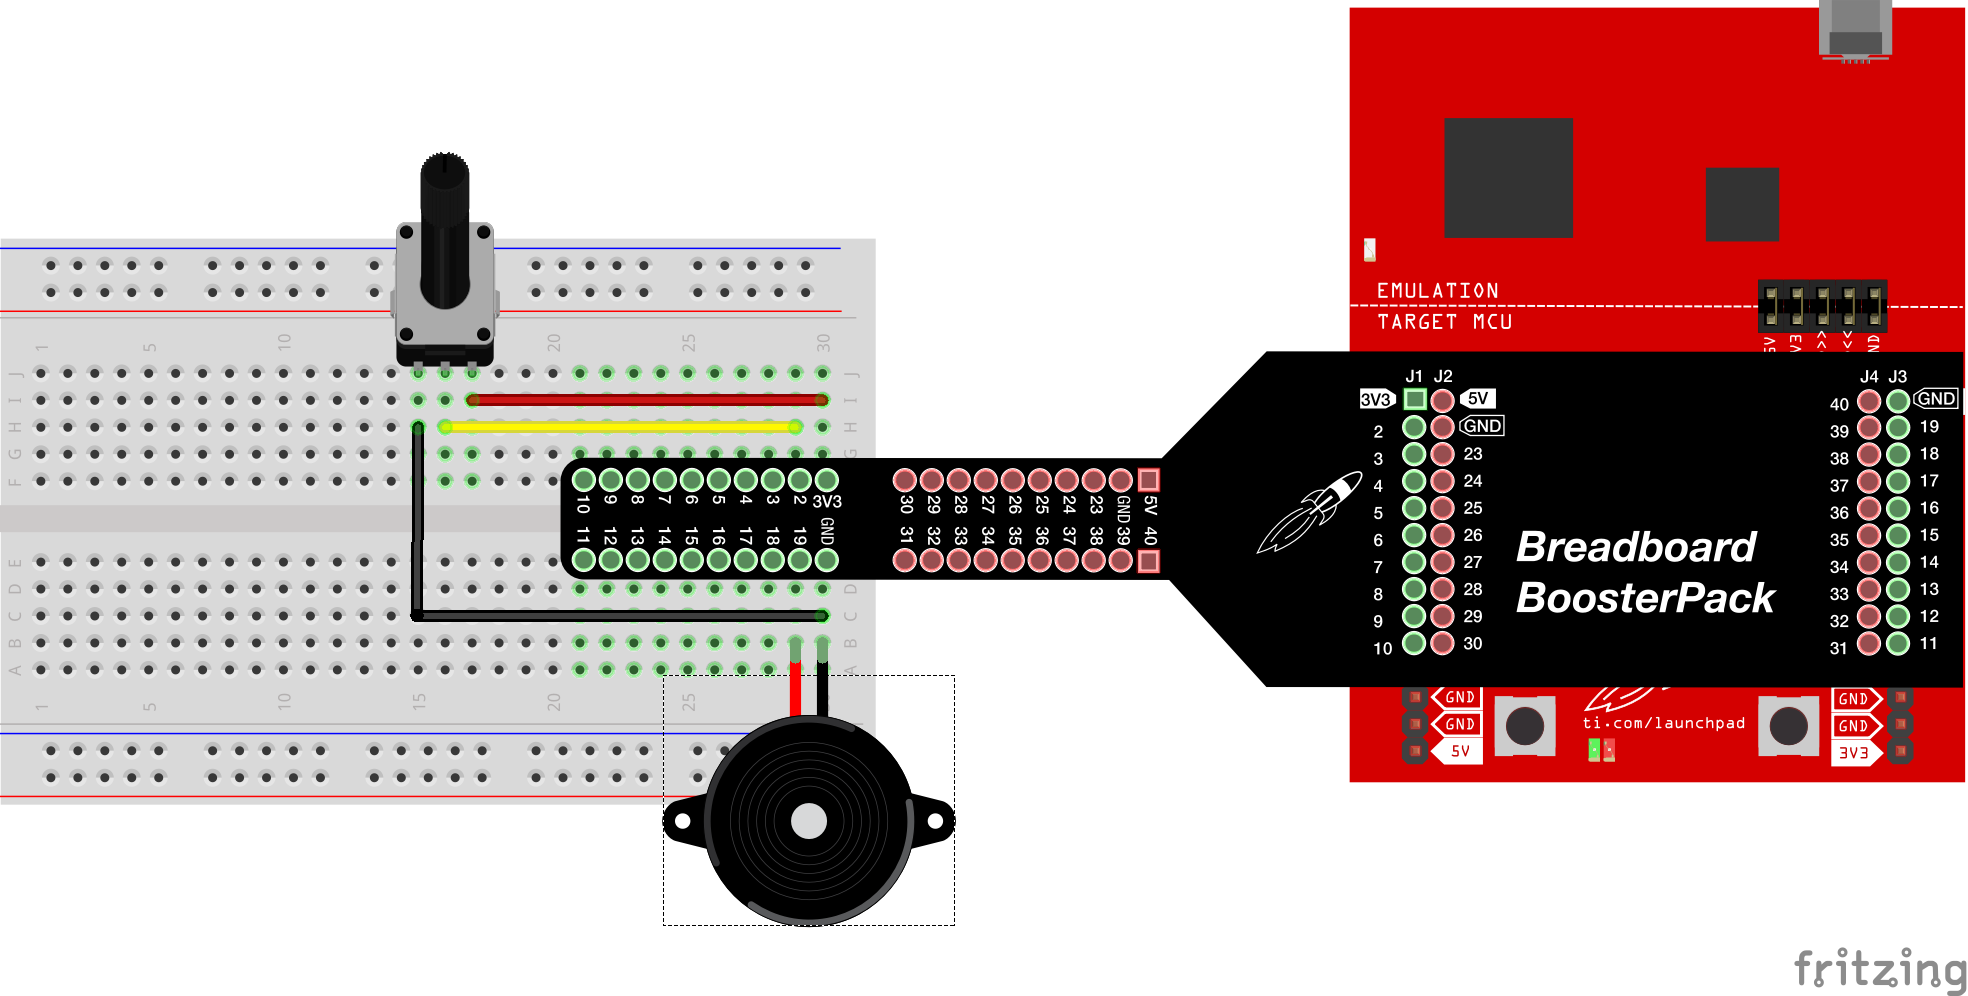
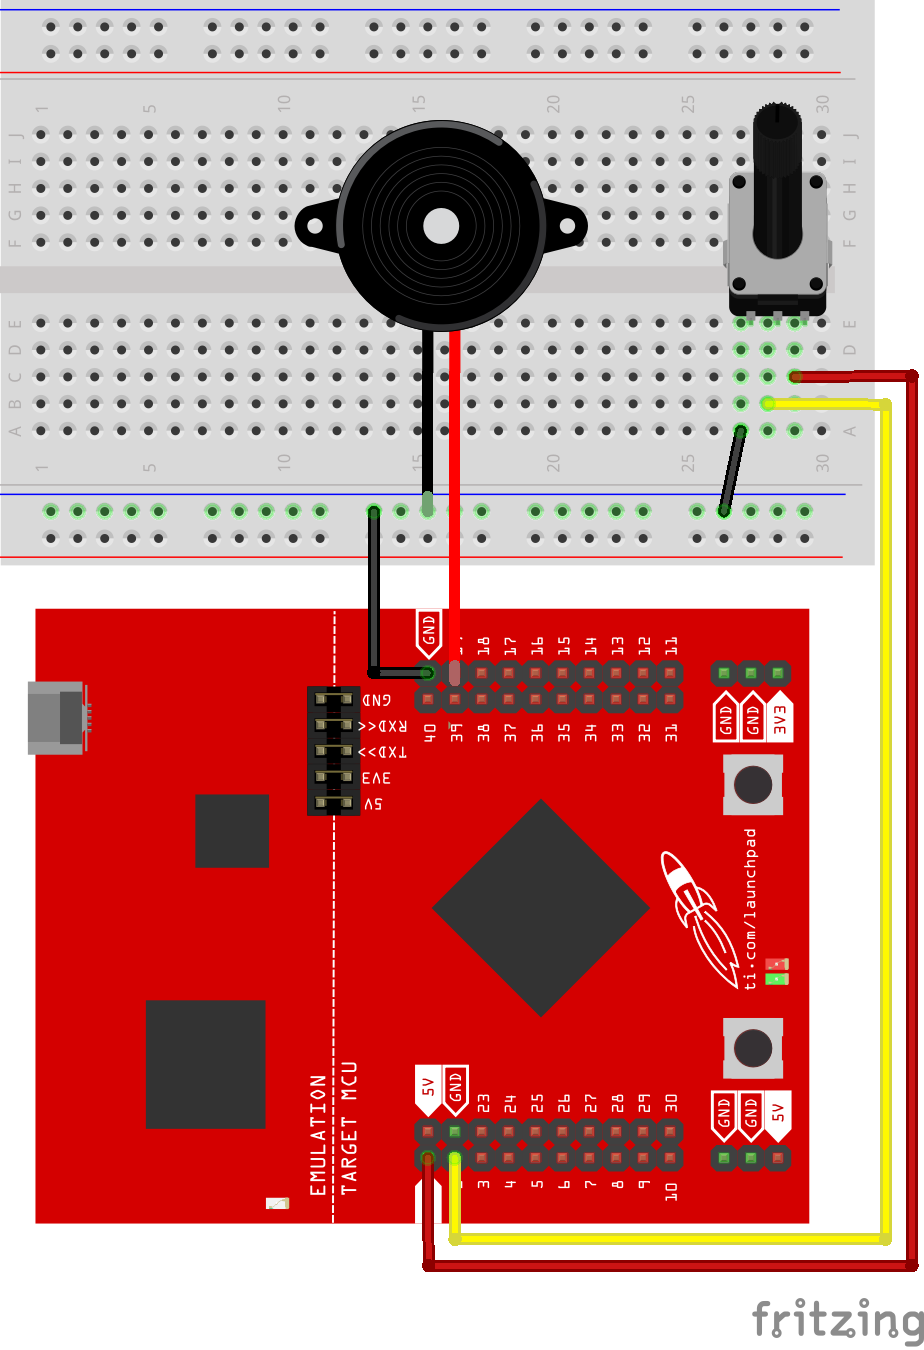
In the real world, many electronics can be controlled by potentiometers (volume knobs, stovetop knobs, etc). In this example, we utilized the analogRead() function to read the analog value on pin 2 (which is connected to the potentiometer). We have used the Red LED as a tool to show that the software works correctly and is reading the value correctly from the potentiometer. Circuit & Schematic
With Breadboard BoosterPack
With LaunchPad
/*
  Example 06: Potentiometer (Variable Resistor)
  Sidekick Basic Kit for TI LaunchPad

  We will use a variable resistor called a potentiometer
  (or pot for short) that uses a mechanical knob to
  change the resistance. We can also use the buzzer and/or
  LED on the LaunchPad to let us know when we pass a threshold.

  Hardware Required:
  * TI LaunchPad
  * Breadboard BoosterPack
  * Breadboard
  * Potentiometer
  * 5x Jumper wires
  * Buzzer

  This example code is in the public domain.
*/

// define your pitch constants for the buzzer
#define NOTE_B0  31
#define NOTE_C1  33
#define NOTE_CS1 35
#define NOTE_D1  37
#define NOTE_DS1 39
#define NOTE_E1  41
#define NOTE_F1  44
#define NOTE_FS1 46
#define NOTE_G1  49
#define NOTE_GS1 52
#define NOTE_A1  55
#define NOTE_AS1 58
#define NOTE_B1  62
#define NOTE_C2  65
#define NOTE_CS2 69
#define NOTE_D2  73
#define NOTE_DS2 78
#define NOTE_E2  82
#define NOTE_F2  87
#define NOTE_FS2 93
#define NOTE_G2  98
#define NOTE_GS2 104
#define NOTE_A2  110
#define NOTE_AS2 117
#define NOTE_B2  123
#define NOTE_C3  131
#define NOTE_CS3 139
#define NOTE_D3  147
#define NOTE_DS3 156
#define NOTE_E3  165
#define NOTE_F3  175
#define NOTE_FS3 185
#define NOTE_G3  196
#define NOTE_GS3 208
#define NOTE_A3  220
#define NOTE_AS3 233
#define NOTE_B3  247
#define NOTE_C4  262
#define NOTE_CS4 277
#define NOTE_D4  294
#define NOTE_DS4 311
#define NOTE_E4  330
#define NOTE_F4  349
#define NOTE_FS4 370
#define NOTE_G4  392
#define NOTE_GS4 415
#define NOTE_A4  440
#define NOTE_AS4 466
#define NOTE_B4  494
#define NOTE_C5  523
#define NOTE_CS5 554
#define NOTE_D5  587
#define NOTE_DS5 622
#define NOTE_E5  659
#define NOTE_F5  698
#define NOTE_FS5 740
#define NOTE_G5  784
#define NOTE_GS5 831
#define NOTE_A5  880
#define NOTE_AS5 932
#define NOTE_B5  988
#define NOTE_C6  1047
#define NOTE_CS6 1109
#define NOTE_D6  1175
#define NOTE_DS6 1245
#define NOTE_E6  1319
#define NOTE_F6  1397
#define NOTE_FS6 1480
#define NOTE_G6  1568
#define NOTE_GS6 1661
#define NOTE_A6  1760
#define NOTE_AS6 1865
#define NOTE_B6  1976
#define NOTE_C7  2093
#define NOTE_CS7 2217
#define NOTE_D7  2349
#define NOTE_DS7 2489
#define NOTE_E7  2637
#define NOTE_F7  2794
#define NOTE_FS7 2960
#define NOTE_G7  3136
#define NOTE_GS7 3322
#define NOTE_A7  3520
#define NOTE_AS7 3729
#define NOTE_B7  3951
#define NOTE_C8  4186
#define NOTE_CS8 4435
#define NOTE_D8  4699
#define NOTE_DS8 4978

/* In the setup function we will set our LED and buzzer as
 * OUTPUT. You can change the LED or buzzer pin to match
 * your cicuit.
 */
void setup()
{
  // Connect potentiometer wiper (middle pin) to analog pin 2
  // Connect the left and right pins to VCC and GND
  // Connect the buzzer longer leg to pin 19 and shorter leg
  // to GND
  // Note: we don't have to configure analog pins as input or
  // output to use them
  pinMode(RED_LED, OUTPUT);  // set your LED pin to OUTPUT
  pinMode(19, OUTPUT); // set your Buzzer pin to OUTPUT
  tone(19,NOTE_C6);
  noTone(19);
  //analogReadResolution(10); // use to change the ADC resolution
}

/* In the loop section we will read potentiometer pin. If
 * it crosses the threshold then we will turn on the LED
 * and play a tone with the buzzer. If it goes below the
 * threshold then the LED and buzzer turn off.
 */
void loop()
{
  int analogValue; // create a variable to store the analog reading
  analogValue = analogRead(2); // store the analog reading
  delay(1); // delay for 1 millisecond for smoothness
  // set a threshold of 512 which is a good midway value for our
  // analog range on the LaunchPads
  if (analogValue > 512)
  {
    digitalWrite(RED_LED, HIGH); // turn LED on
    tone(19, NOTE_C6); // play a tone
  }
  else
  {
    digitalWrite(RED_LED, LOW); // turn LED off
    noTone(19); // stop playing a tone
  }
}Can you make the LED change brightness when the potentiometer is turned? Make sure to hook the LED to a PWM pin.
Can you make the LED blink faster or slower based on the potentiometer? Hint: Save the analogRead() value to a variable and use it as your delay time.
Code not uploading?
Check for errors in Energia debug window. The compiler will tell you what is happening. Errors are in red text.
Sometimes your LaunchPad gets stuck or hung up on the previous code. Unplug your LaunchPad and plug it back in to perform a full reset. This is called a power on reset. Sometimes using the RESET button can work but taking away the power and letting the microcontroller fully reset is often best.
If you have a failure to upload it could be your drivers are not properly installed. Energia will sometimes give the error "No unused FET Found" which means it can’t find a LaunchPad connected to your computer. Make sure you download the drivers for your operating system found on the Getting Started Guide.
If you had no problem with the previous Blink example, your Energia should be correctly set up. Restart your LaunchPad and restart Energia IDE if you encounter any problems. Make sure to select the right serial port and board type under the Tools menu.
Potentiometer feels backward?
The direction of the pot is based on how the VCC and GND wires are hooked up. If you want to switch the direction, you can either flip the potentiometer in place or swap the GND and VCC wires. This is called swapping the polarity.
LED not lighting up?
Make sure you properly uploaded the code and that you properly named your variables for the LED pins. There is very little chance that your RGB LED is broken, but we can verify by blinking a different LED with the same code.
Make sure your pins are properly connected, if they are not the LED will not light up properly. The GND pin of the LED should be connected to the GND pin of the LaunchPad.
Hit the reset button, sometimes this is needed for the LaunchPad to run the newly uploaded program.
Buzzer not buzzing?
Make sure you properly uploaded the code and that you properly named your variables for the buzzer pin.
Make sure your pins are properly connected, if they are not the buzzer will not make sounds properly.
Hit the reset button, sometimes this is needed for the LaunchPad to run the newly uploaded program.
For additional support, try searching the Energia forums on 43oh.com. We believe in you to figure out any problems, now believe in yourself and find the solution!
Corrections, suggestions, and new documentation are very welcomed. They can be contributed to the energia website repository on Github.
The text of the Energia getting started and reference guides are licensed under a Creative Commons Attribution-ShareAlike 3.0 License. The Energia reference is based on the Wiring/Arduino reference. Code samples in the guide are released into the public domain.
Energia sketches are C/C++ based and compiled with the open-source compiler MSPGCC or arm-gcc-none-eabi. The Energia language comes from Wiring. The Energia environment is based on Processing and includes modifications made by Wiring and Arduino.
© Energia