

Learn how to create sound with the buzzer.
TI LaunchPad
Breadboard BoosterPack
Breadboard
Buzzer
2x Jumper Wires
In this example we will be using the tone() function to create sounds with the buzzer. The buzzer we have is a piezoelectric element which means it can change it’s tone using a combination of electrical and mechanical principles. The buzzer clicks at different frequencies and if we use our LaunchPad digital pin to click fast enough, we can generate sound from the buzzer. The tone() API will help us do all the work, we just need to tell it what pin the buzzer is on and what pitch to play for how long. We can use noTone() to stop the sound.
tone() is one of the many Energia APIs that are available for your use. These are special functions built into Energia that have special purposes. While Energia code uses standard C programming code, the Energia APIs (Application Programming Interfaces) only exist in Energia. We’ve been using a lot of the APIs already, such as pinMode(), digitalWrite(), digitalRead(), analogWrite(), analogRead(). You can see the whole list of APIs in the reference section of the Energia website at www.energia.nu/reference. The Energia APIs are based on Wiring, which is also the basis of many popular programming environments like Arduino. This makes it easy to understand and also easy to jump over between different hardware. This concept is called software abstraction. Energia helps us hide some of the details and boring stuff, so we can have an easier and more fun time programming.
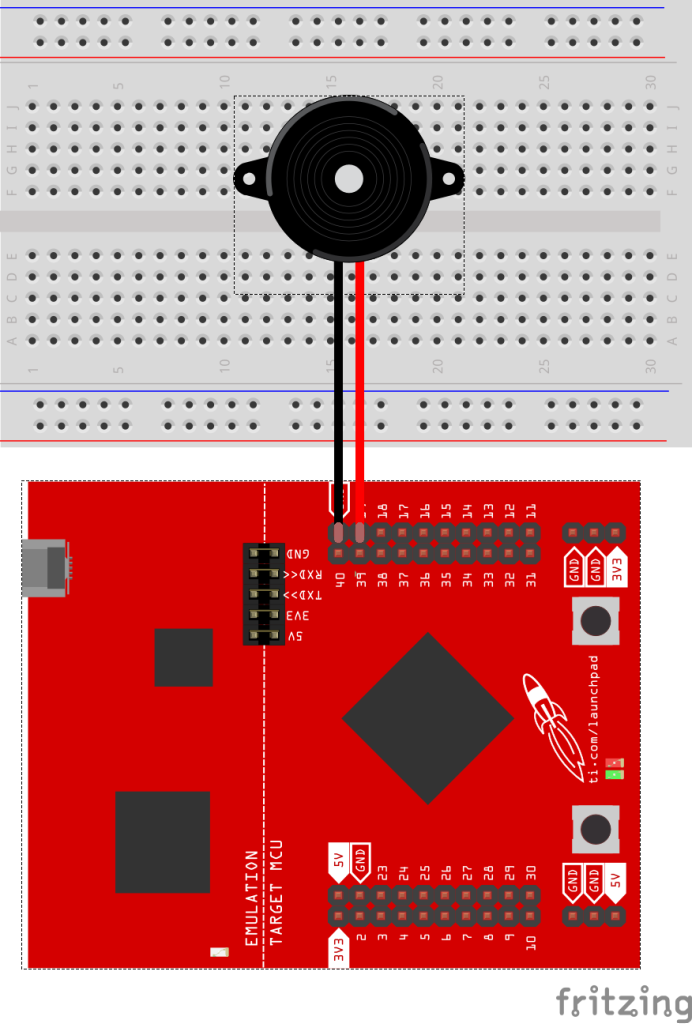
This example is pretty simple to set up, which will give you more time to create your own melodies! To make your own, you can change the values in the melody and note duration arrays. Search the internet to find other melodies or experiment and make your own. If you know which notes you need and how long to play each one, you can quickly make up a melody that can play on the buzzer. Circuit & Schematic
With Breadboard BoosterPack
With LaunchPad
/*
  Example 05: Piezo Buzzer (Sound)
  Sidekick Basic Kit for TI LaunchPad

  Play birthday tune through the buzzer, demonstrating the
  buzzer tone() API and pitch/tone (hence music) generation

  Hardware Required:
  * TI LaunchPad
  * Breadboard BoosterPack
  * Breadboard
  * 2x Jumper wires
  * Buzzer

  This example code is in the public domain.
*/

// define your pitch constants
// these will be notes that can be used to make a song
#define NOTE_B0  31
#define NOTE_C1  33
#define NOTE_CS1 35
#define NOTE_D1  37
#define NOTE_DS1 39
#define NOTE_E1  41
#define NOTE_F1  44
#define NOTE_FS1 46
#define NOTE_G1  49
#define NOTE_GS1 52
#define NOTE_A1  55
#define NOTE_AS1 58
#define NOTE_B1  62
#define NOTE_C2  65
#define NOTE_CS2 69
#define NOTE_D2  73
#define NOTE_DS2 78
#define NOTE_E2  82
#define NOTE_F2  87
#define NOTE_FS2 93
#define NOTE_G2  98
#define NOTE_GS2 104
#define NOTE_A2  110
#define NOTE_AS2 117
#define NOTE_B2  123
#define NOTE_C3  131
#define NOTE_CS3 139
#define NOTE_D3  147
#define NOTE_DS3 156
#define NOTE_E3  165
#define NOTE_F3  175
#define NOTE_FS3 185
#define NOTE_G3  196
#define NOTE_GS3 208
#define NOTE_A3  220
#define NOTE_AS3 233
#define NOTE_B3  247
#define NOTE_C4_1 260
#define NOTE_C4  262
#define NOTE_CS4 277
#define NOTE_D4  294
#define NOTE_DS4 311
#define NOTE_E4  330
#define NOTE_F4  349
#define NOTE_FS4 370
#define NOTE_G4  392
#define NOTE_GS4 415
#define NOTE_A4  440
#define NOTE_AS4 466
#define NOTE_B4  494
#define NOTE_C5  523
#define NOTE_CS5 554
#define NOTE_D5  587
#define NOTE_DS5 622
#define NOTE_E5  659
#define NOTE_F5  698
#define NOTE_FS5 740
#define NOTE_G5  784
#define NOTE_GS5 831
#define NOTE_A5  880
#define NOTE_AS5 932
#define NOTE_B5  988
#define NOTE_C6  1047
#define NOTE_CS6 1109
#define NOTE_D6  1175
#define NOTE_DS6 1245
#define NOTE_E6  1319
#define NOTE_F6  1397
#define NOTE_FS6 1480
#define NOTE_G6  1568
#define NOTE_GS6 1661
#define NOTE_A6  1760
#define NOTE_AS6 1865
#define NOTE_B6  1976
#define NOTE_C7  2093
#define NOTE_CS7 2217
#define NOTE_D7  2349
#define NOTE_DS7 2489
#define NOTE_E7  2637
#define NOTE_F7  2794
#define NOTE_FS7 2960
#define NOTE_G7  3136
#define NOTE_GS7 3322
#define NOTE_A7  3520
#define NOTE_AS7 3729
#define NOTE_B7  3951
#define NOTE_C8  4186
#define NOTE_CS8 4435
#define NOTE_D8  4699
#define NOTE_DS8 4978

// Connect longer leg of buzzer to pin 19 and shorter leg to GND
// on the breadboard. The buzzer will work for any GPIO pin.
// You can switch to other pins later.
int buzzerPin = 19;

// Next we will set up an Array to store our notes in the melody
// An array is way to store data in a comma seperated structure.
// notes in the birthday melody:
int melody[] = {
   NOTE_C4_1, NOTE_C4, NOTE_D4, NOTE_C4, NOTE_F4,NOTE_E4,
   NOTE_C4_1, NOTE_C4, NOTE_D4, NOTE_C4, NOTE_G4, NOTE_F4,
   NOTE_C4_1, NOTE_C4, NOTE_C5, NOTE_A4, NOTE_F4, NOTE_F4,
   NOTE_E4, NOTE_D4,   NOTE_AS4, NOTE_AS4, NOTE_A4,
   NOTE_F4, NOTE_G4, NOTE_F4};

// note durations: 4 = quarter note, 8 = eighth note, etc.:
int noteDurations[] = {
  4, 4, 2, 2, 2, 1,
  4, 4, 2, 2, 2, 1,
  4, 4, 2, 2, 4, 4,
  2, 1, 4, 4, 2, 2, 2, 1};

/* In the setup function we will set our buzzer pin to
 * output. That's all we need to do at setup.
 */
void setup()
{
  pinMode(buzzerPin, OUTPUT); // set buzzerPin to OUTPUT
}

/* In the loop section we will use the tone function to
 * enable enable the sound. Tone needs arguments for the
 * pin of the buzzer, the note, and the note duration.
 */
void loop()
{
  for (int thisNote = 0; thisNote < 26; thisNote++) {

    // to calculate the note duration, take one second divided by the
    // note type. quarter note = 1000 / 4, eighth note = 1000/8, etc.
    int noteDuration = 1000/noteDurations[thisNote];
    tone(buzzerPin, melody[thisNote], noteDuration);

    int pauseBetweenNotes = noteDuration + 50; // delay between pulse
    delay(pauseBetweenNotes);

    noTone(buzzerPin); // stop the tone playing
  }
}Can you play a different melody? Try to translate notes of a melody into the tones and store them in an array.
Code not uploading?
Check for errors in Energia debug window. The compiler will tell you what is happening. Errors are in red text.
Sometimes your LaunchPad gets stuck or hung up on the previous code. Unplug your LaunchPad and plug it back in to perform a full reset. This is called a power on reset. Sometimes using the RESET button can work but taking away the power and letting the microcontroller fully reset is often best.
If you have a failure to upload it could be your drivers are not properly installed. Energia will sometimes give the error "No unused FET Found" which means it can’t find a LaunchPad connected to your computer. Make sure you download the drivers for your operating system found on the Getting Started Guide.
If you had no problem with the previous Blink example, your Energia should be correctly set up. Restart your LaunchPad and restart Energia IDE if you encounter any problems. Make sure to select the right serial port and board type under the Tools menu.
Code not working?
Try hitting the reset button. Sometimes the LaunchPad needs to get reset after the program is uploaded.
Buzzer not buzzing?
Make sure you properly uploaded the code and that you properly named your variables for the buzzer pin.
Make sure your pins are properly connected, if they are not the buzzer will not make sounds properly. The GND pin (shorter leg) of the buzzer should be connected to the GND pin of the LaunchPad. The (+) pin should be connected to a digital pin on the LaunchPad.
For additional support, try searching the Energia forums on 43oh.com. We believe in you to figure out any problems, now believe in yourself and find the solution!
Corrections, suggestions, and new documentation are very welcomed. They can be contributed to the energia website repository on Github.
The text of the Energia getting started and reference guides are licensed under a Creative Commons Attribution-ShareAlike 3.0 License. The Energia reference is based on the Wiring/Arduino reference. Code samples in the guide are released into the public domain.
Energia sketches are C/C++ based and compiled with the open-source compiler MSPGCC or arm-gcc-none-eabi. The Energia language comes from Wiring. The Energia environment is based on Processing and includes modifications made by Wiring and Arduino.
© Energia