
Learn how to control several outputs simultaneously.
TI LaunchPad
Breadboard BoosterPack
Breadboard
4x Red LED
4x Green LED
9x Jumper Wires
8x 330 ohm resistor (optional)
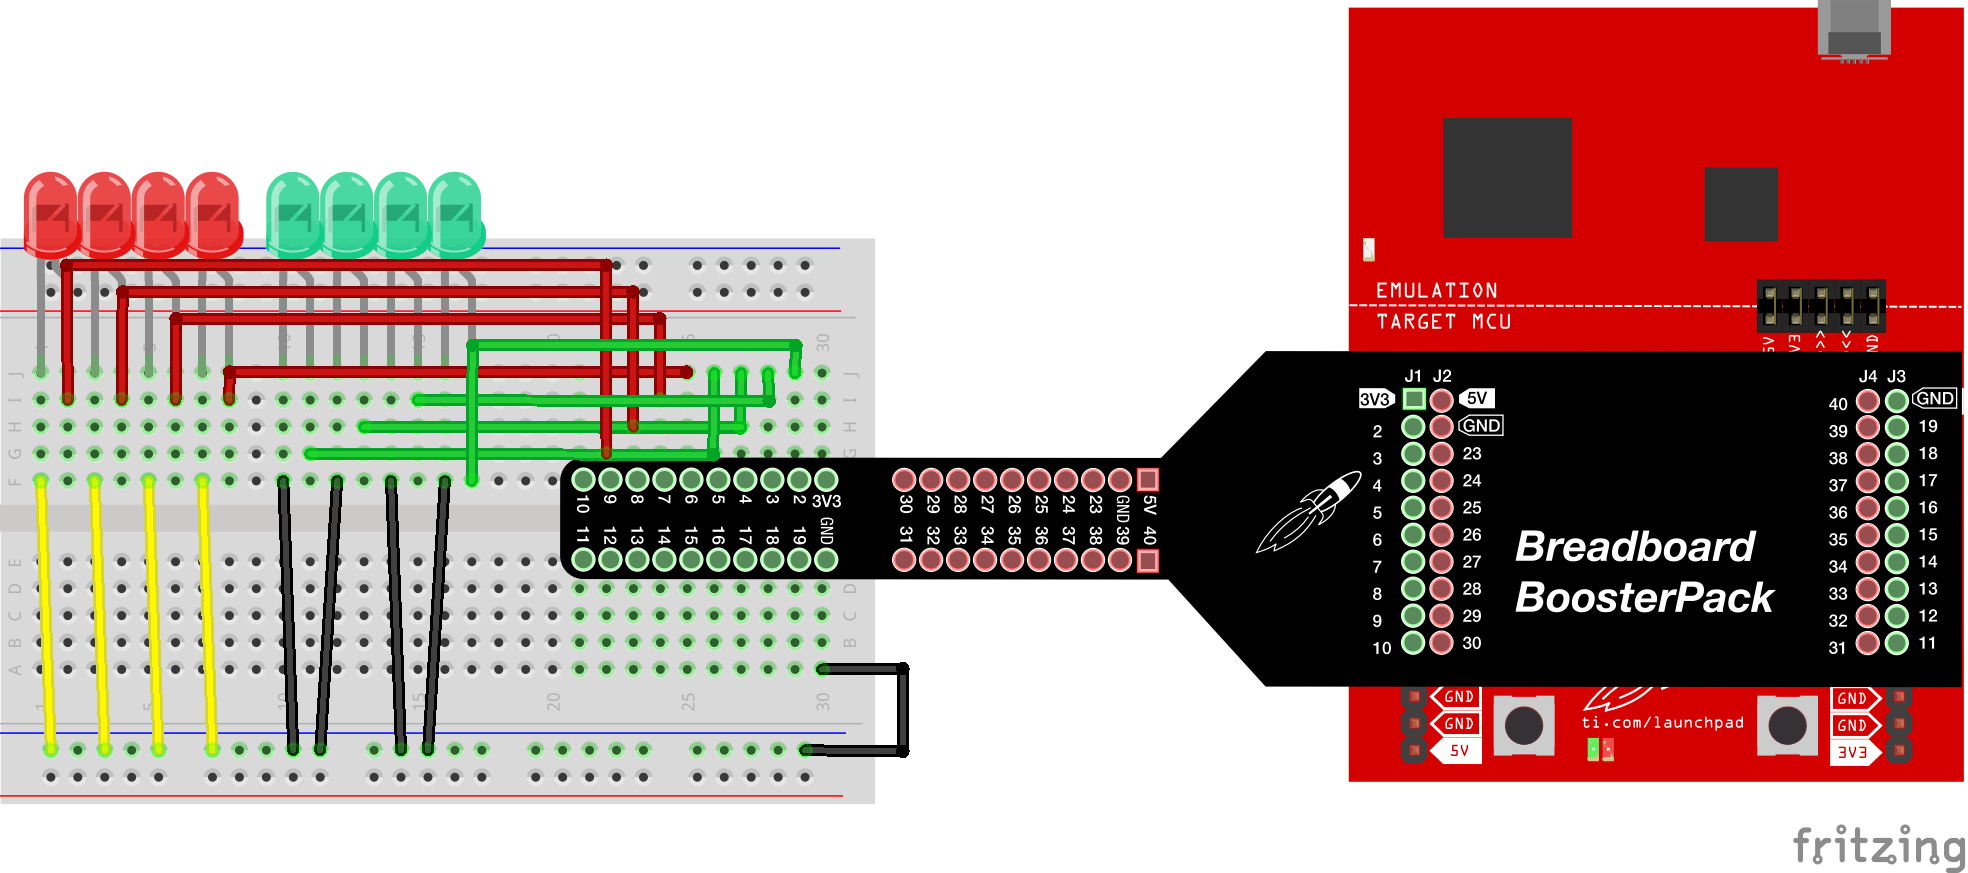
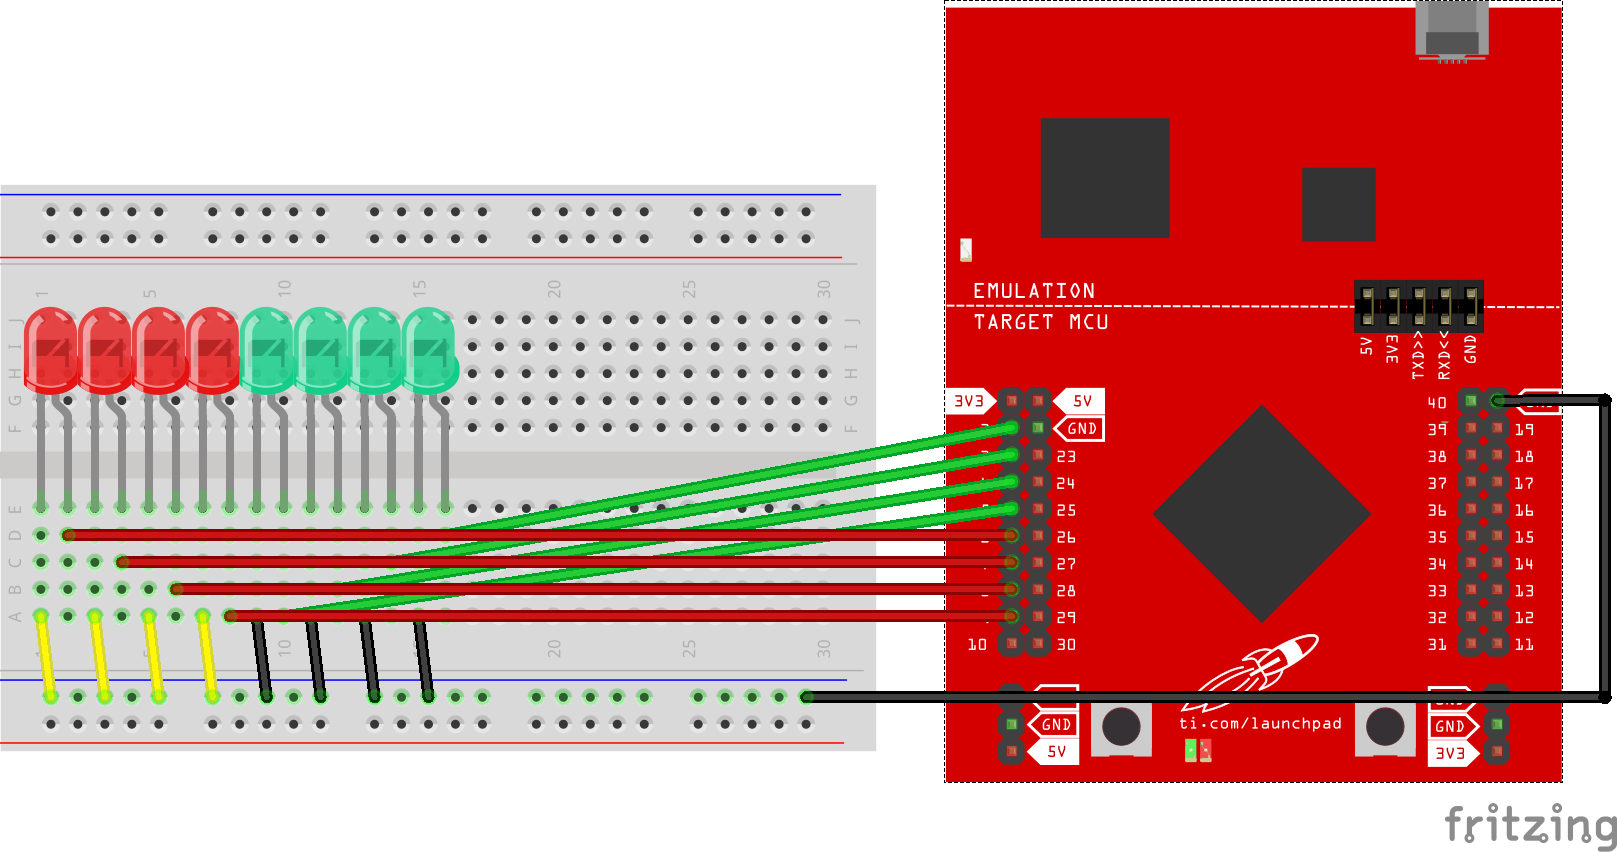
In this example we are going to take the blink example a bit further and incorporate more LEDs and more pins. We are going to connect eight LEDs to the LaunchPad which will give us the option to run different lighting sequences. We will get to build a bigger circuit and learn a bit more about the concepts in programming.
Let’s talk about for loops. We know from our loop() function that a loop will run forever. What makes a FOR loop special is it will run until the conditions of the FOR loop are met.
In this example, we are going to use for loops to help us run through an object called an array quickly and efficiently. We are going to use an array to store our LED pins. An array is just a variable where we can store multiple values. Basically it’s like a list, and we can enter different list items into the array which are separated by commas. An array makes use of the square brackets [] which contain either the size (when declaring the array) or the position in the array (when using it as a variable). Understanding arrays just takes a little bit of practice, but are extremely useful.
In this example, we will also introduce functions. You’ve already been using functions (remember setup() and loop()?) but now we can define our own custom functions. Here we are using functions to help us create light patterns with the LEDs.
You may be asking yourself why the variables and function names with more than one word (compound words) start with a lower case letter but proceed with capitalized letters. This is called camel case, which is a popular style when writing code. You as the programmer can use whatever style you like when declaring variables and functions, but camel case is a popular one that you will see in many code examples. Also, why can’t the names start with a number? In C programming, you can’t have a variable that begins with a number, otherwise you will get an error from the compiler. This is because in our code we use numbers as mathematical values so the compiler wants to make sure you are clearly using numbers and variables properly. Circuit & Schematic
With Breadboard BoosterPack
With LaunchPad
/*
  Example 03: Multiple LED (Many Outputs)
  Sidekick Basic Kit for TI LaunchPad

  In this example we are going to blink 8 different LEDs at the same time.
  This will help us learn how to build a bigger circuit and manage multiple
  outputs in our program. Connect VCC and GND to the power rails and then
  connect the short legs of the LEDs to GND. Connect the long legs of the
  LEDs to the optional resistors and then connect the resistors to pins
  2 - 9 on the LaunchPad with jumper wires.

  Hardware Required:
  * TI LaunchPad
  * Breadboard BoosterPack
  * Breadboard
  * 8x LEDs (Green and Red)
  * 10x Jumper wires
  * 8x 330 ohm resistors (optional)

  This example code is in the public domain.
*/

// LED Pin Variables
int ledPins[] = {2,3,4,5,6,7,8,9};
/*
  The above is an array to hold the pin each LED is connected to
  such as LED #0 is connected to pin 2, LED #1, pin 3, and so on.
  You can change the pins if you wish, you just have to connect
  the LEDs to the correct pins you have in the sketch.
  Notice we skip pin 16 because this is a RST pin on the LaunchPad
  if we connected pin 16 the microcontroller would constantly reset
  and get stuck.
  To use an array you must call the index, so if you use ledPins[0]
  this would equal 2 and ledPins[7] would equal 9. Arrays can be
  more efficient than making a bunch of separate variables.
*/

/* In the setup function we need to set the LED pins to OUTPUT. Because
 * it is stored in an array, we can use a FOR loop to cycle through all
 * eight pins. The FOR loop will initialize the variable 'i' to zero,
 * and increment 'i' (i++) until the condition i < 8 is no longer met.
 */
void setup()
{
  for(int i = 0; i < 8; i++){       // this is a loop and will repeat eight times
      pinMode(ledPins[i], OUTPUT);  // we use this to set each LED pin to output
  }                                 // the code this replaces is below

  /* This code does the same thing but is more verbose
  pinMode(ledPins[0],OUTPUT);
  pinMode(ledPins[1],OUTPUT);
  pinMode(ledPins[2],OUTPUT);
  pinMode(ledPins[3],OUTPUT);
  pinMode(ledPins[4],OUTPUT);
  pinMode(ledPins[5],OUTPUT);
  pinMode(ledPins[6],OUTPUT);
  pinMode(ledPins[7],OUTPUT);
  */
}


/* In the loop section we will run light sequences that are stored in their own
 * functions. A function is a piece of code that is custom defined and will run
 * when it is called explicitly in the setup or loop function. It is good practice
 * to put your custom functions at the bottom of the sketch after the loop().
 */
void loop()
{
  insideOutside(); // lights the two middle LEDs then moves them out then back in again
  clearAll();      // turns all the LEDs off
  oneByOne();      // this function will turn on each LED one by one then turn each off
  oneByOneShort();  // does the same as oneByOne() but with much less typing
  passThrough();   // this function looks like the LED is scolling
}

/* In this section of the code we can define our own functions. A function is a block of code
 * that can be called elsewhere in the program. Below you will see some example functions of
 * LED sequences. You can add your own and experiment with custom LED logic. Just call your
 * functions in the loop() like the others above.
 *
 * Why is the first letter of the functions and variables not capitalized, but the other words
 * of the name are?  This is called camel case and is a common way to declare variables and
 * functions. You don't have to do it when writing your functions but it is a popular style.
 */

/* insideOutside() - This will turn on the two middle LEDs then the next two out until it reaches
 * the ends.
 */
void insideOutside(){
  int delayTime = 300; // the time (milliseconds) to pause between LEDs make smaller for quicker
                       // switching and larger for slower switching

  // runs the LEDs out starting from the middle
  for(int i = 0; i <= 3; i++){
    int offLED = i - 1;  // Calculate which LED was turned on the last pass. For i = 1 to 7 this is
    if(i == 0) {         // i minus 1, however if i = 0 we can't turn off LED -1 (doesn't exist), so
      offLED = 3;        // instead we turn off LED 7, (looping back around)
    }

    int onLED1 = 3 - i; // this is the first LED to go on -LED #3 when i = 0 and LED #0 when i = 3
    int onLED2 = 4 + i; // this is the first LED to go on -LED #4 when i = 0 and LED #7 when i = 3
    int offLED1 = 3 - offLED; // turns off the LED we turned on last time
    int offLED2 = 4 + offLED; // turns off the LED we turned on last time

    digitalWrite(ledPins[onLED1], HIGH); // turn LED on
    digitalWrite(ledPins[onLED2], HIGH); // turn LED on
    digitalWrite(ledPins[offLED1], LOW); // turn LED off
    digitalWrite(ledPins[offLED2], LOW); // turn LED off
    delay(delayTime);
  }

  // runs the LEDs back toward the middle
  for(int i = 3; i >= 0; i--){
    int offLED = i + 1;  // Calculate which LED was turned on the last pass. For i = 1 to 7 this is
    if(i == 3) {         // i plus 1
      offLED = 0;
    }

    int onLED1 = 3 - i; // this is the first LED to go on ie. LED #3 when i = 0 and LED #0 when i = 3
    int onLED2 = 4 + i; // this is the first LED to go on ie. LED #4 when i = 0 and LED #7 when i = 3
    int offLED1 = 3 - offLED; // turns off the LED we turned on last time
    int offLED2 = 4 + offLED; // turns off the LED we turned on last time

    digitalWrite(ledPins[onLED1], HIGH); // turn LED on
    digitalWrite(ledPins[onLED2], HIGH); // turn LED on
    digitalWrite(ledPins[offLED1], LOW); // turn LED off
    digitalWrite(ledPins[offLED2], LOW); // turn LED off
    delay(delayTime);
  }
}

/* clearAll() - Turns off all the LEDs so it can start fresh. */
void clearAll(){
  // Turns each LED off
  digitalWrite(ledPins[7], LOW); // Turns off LED #0 (connected to pin 11)
  digitalWrite(ledPins[6], LOW); // Turns off LED #1 (connected to pin 12)
  digitalWrite(ledPins[5], LOW); // Turns off LED #2 (connected to pin 13)
  digitalWrite(ledPins[4], LOW); // Turns off LED #3 (connected to pin 14)
  digitalWrite(ledPins[3], LOW); // Turns off LED #4 (connected to pin 15)
  digitalWrite(ledPins[2], LOW); // Turns off LED #5 (connected to pin 17)
  digitalWrite(ledPins[1], LOW); // Turns off LED #6 (connected to pin 18)
  digitalWrite(ledPins[0], LOW); // Turns off LED #7 (connected to pin 19)

  /* This code does the same thing but less verbose
  for(int i = 7; i >= 0; i--){
    digitalWrite(ledPins[i], LOW);  // Turns off LED #i each time this runs
  }
  */

}

/* oneByOne() - Will light one LED then delay for delayTime then light the next LED until all LEDs
 * are on, then it will then turn them off one after another. This approach works but is a lot of code
 * that we can make more effcient.
 */
void oneByOne(){
  int delayTime = 300; // the time (milliseconds) to pause between LEDs - make smaller for quicker
                       // switching and larger for slower switching
  // Turns each LED on
  digitalWrite(ledPins[0], HIGH); // Turns on LED #0 (connected to pin 11)
  delay(delayTime);
  digitalWrite(ledPins[1], HIGH); // Turns on LED #1 (connected to pin 12)
  delay(delayTime);
  digitalWrite(ledPins[2], HIGH); // Turns on LED #2 (connected to pin 13)
  delay(delayTime);
  digitalWrite(ledPins[3], HIGH); // Turns on LED #3 (connected to pin 14)
  delay(delayTime);
  digitalWrite(ledPins[4], HIGH); // Turns on LED #4 (connected to pin 15)
  delay(delayTime);
  digitalWrite(ledPins[5], HIGH); // Turns on LED #5 (connected to pin 17)
  delay(delayTime);
  digitalWrite(ledPins[6], HIGH); // Turns on LED #6 (connected to pin 18)
  delay(delayTime);
  digitalWrite(ledPins[7], HIGH); // Turns on LED #7 (connected to pin 19)
  delay(delayTime);

  // Turns each LED off
  digitalWrite(ledPins[7], LOW); // Turns off LED #0 (connected to pin 11)
  delay(delayTime);
  digitalWrite(ledPins[6], LOW); // Turns off LED #1 (connected to pin 12)
  delay(delayTime);
  digitalWrite(ledPins[5], LOW); // Turns off LED #2 (connected to pin 13)
  delay(delayTime);
  digitalWrite(ledPins[4], LOW); // Turns off LED #3 (connected to pin 14)
  delay(delayTime);
  digitalWrite(ledPins[3], LOW); // Turns off LED #4 (connected to pin 15)
  delay(delayTime);
  digitalWrite(ledPins[2], LOW); // Turns off LED #5 (connected to pin 17)
  delay(delayTime);
  digitalWrite(ledPins[1], LOW); // Turns off LED #6 (connected to pin 18)
  delay(delayTime);
  digitalWrite(ledPins[0], LOW); // Turns off LED #7 (connected to pin 19)
  delay(delayTime);
}

/* oneByOneLoop() - Will light one LED then delay for delayTime then light the next LED until all
 * LEDs are on, then it will then turn them off one after another. This does it using a loop which
 * makes for a lot less typing than oneByOne().
 */
void oneByOneShort(){
  int delayTime = 300; // the time (milliseconds) to pause between LEDs - make smaller for quicker
                       // switching and larger for slower switching

  // Turn each LED on one after another
  // This for loop will repeat 8 times, with 1 added to i each time (i++). The first time i will
  // equal 0 the final time i will equal 7;
  for(int i = 0; i <= 7; i++){
    digitalWrite(ledPins[i], HIGH);  // Turns on LED #i each time this runs
    delay(delayTime);
  }

  // Turn Each LED off one after another
  // This for loop will repeat 8 times, with 1 subtracted from i each time (i--).
  // The first time i will = 7 the final time i will equal 0;
  for(int i = 7; i >= 0; i--){
    digitalWrite(ledPins[i], LOW);  // Turns off LED #i each time this runs
    delay(delayTime);
  }
}

/* passThrough() - Will light one LED then the next turning off all the others making it look like
 * it is scrolling.
 */
void passThrough(){
  int delayTime = 300; // the time (milliseconds) to pause between LEDs - make smaller for quicker
                       // switching and larger for slower

  for(int i = 0; i <= 7; i++){
    int offLED = i - 1;  // Calculate which LED was turned on the last pass. For i = 1 to 7 this is
    if(i == 0) {         // i minus 1, however if i = 0 we can't turn off LED -1 (doesn't exist), so
      offLED = 7;        // instead we turn off LED 7, (looping back around)
    }

    digitalWrite(ledPins[i], HIGH);     // turn on LED #i
    digitalWrite(ledPins[offLED], LOW); // turn off the LED we turned on last time
    delay(delayTime);
  }
}Can you create a new function with a different lighting sequence? Troubleshooting
Code not uploading?
Check for errors in Energia debug window. The compiler will tell you what is happening. Errors are in red text.
Sometimes your LaunchPad gets stuck or hung up on the previous code. Unplug your LaunchPad and plug it back in to perform a full reset. This is called a power on reset. Sometimes using the RESET button can work but taking away the power and letting the microcontroller fully reset is often best.
If you have a failure to upload it could be your drivers are not properly installed. Energia will sometimes give the error "No unused FET Found" which means it can’t find a LaunchPad connected to your computer. Make sure you download the drivers for your operating system found on the Getting Started Guide.
If you had no problem with the previous Blink example, your Energia should be correctly set up. Restart your LaunchPad and restart Energia IDE if you encounter any problems. Make sure to select the right serial port and board type under the Tools menu.
LED not lighting up?
Make sure you properly uploaded the code and that you properly named your variables for the LED pins. There is very little chance that your LED is broken, but we can verify by blinking a different LED with the same code.
Make sure your pins are properly connected, if they are not the LED will not light up properly. The GND pin of the LED (shorter leg) should be connected to the GND pin of the LaunchPad.
LED sequence is off?
Check your wires are sequential with the LaunchPad pins. The example assumes that the LEDs are connected in order.
Still not right? Start from the beginning!
It is very easy to make a small mistake that can be hard to spot. With these simple circuits it can make sense to take everything out of the breadboard and try setting it up again.
For additional support, try searching the Energia forums on 43oh.com. We believe in you to figure out any problems, now believe in yourself and find the solution!
Corrections, suggestions, and new documentation are very welcomed. They can be contributed to the energia website repository on Github.
The text of the Energia getting started and reference guides are licensed under a Creative Commons Attribution-ShareAlike 3.0 License. The Energia reference is based on the Wiring/Arduino reference. Code samples in the guide are released into the public domain.
Energia sketches are C/C++ based and compiled with the open-source compiler MSPGCC or arm-gcc-none-eabi. The Energia language comes from Wiring. The Energia environment is based on Processing and includes modifications made by Wiring and Arduino.
© Energia