if (someCondition) {
   // do stuff if the condition is true
}
If statements are conditional, which means it allows you to execute certain sections of code when certain conditionals are met. If this thing happens, then do that thing.
MSP430 LaunchPad
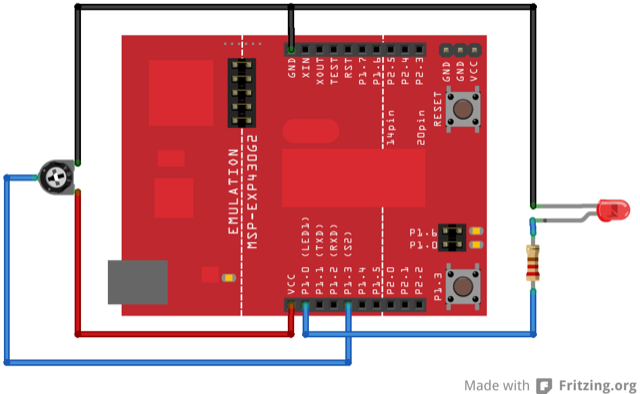
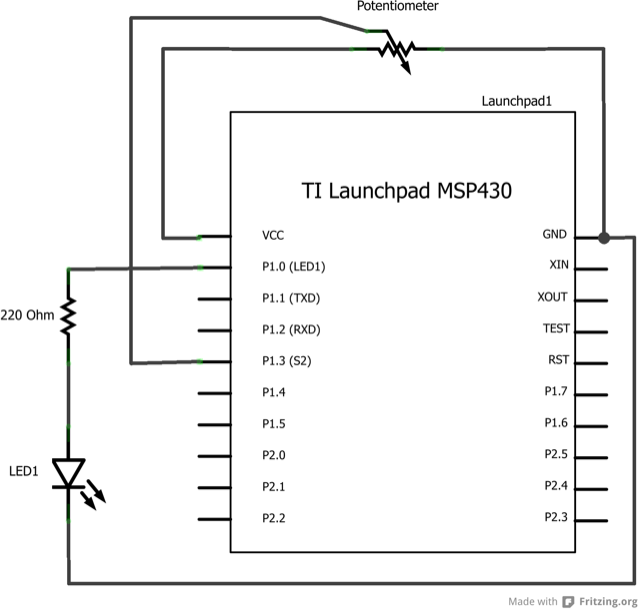
(1) Potentiometer or variable resistor
(1) 220 ohm resistor
(1) LED
Hook-up wire
The if() statement is the most basic of all programming control structures. It allows you to make something happen or not depending on whether a given condition is true or not. It looks like this:
if (someCondition) {
// do stuff if the condition is true
}
There is a common variation called if-else that looks like this:
if (someCondition) {
   // do stuff if the condition is true
} else {
   // do stuff if the condition is false
}
There’s also the else-if, where you can check a second condition if the first is false:
if (someCondition) {
   // do stuff if the condition is true
} else if (anotherCondition) {
   // do stuff only if the first condition is false
   // and the second condition is true
}
You’ll use if statements all the time. The example below turns on an LED on pin 2 (the built-in LED on the MSP-EXP430G2 LaunchPad) if the value read on an analog input goes above a certain threshold.
In the code below, a variable called analogValue is used to store the data collected from a potentiometer connected to the LaunchPad on analogPin A3. This data is then compared to a threshold value. If the analog value is found to be above the set threshold the LED connected to digital pin 2 is turned on. If analogValue is found to be < threshold, the LED remains off.
/*
  Conditionals - If statement

  This example demonstrates the use of if() statements.
  It reads the state of a potentiometer (an analog input) and turns on an LED
  only if the LED goes above a certain threshold level. It prints the analog value
  regardless of the level.

  The circuit:
  * potentiometer connected to analog pin A3.
    Center pin of the potentiometer goes to the analog pin.
    side pins of the potentiometer go to +3V and ground
  * LED connected from digital pin 2 to ground

  * Note: On the MSP-EXP430G2 LaunchPad boards, there is already an LED connected
    to pin 2, so you don't need any extra components for this example.

  created 17 Jan 2009
  by Tom Igoe
  modified 16 Apr 2013
  by Tom Igoe

  This example code is in the public domain.

*/

// These constants won't change:
const int analogPin = A3;    // pin that the sensor is attached to
const int ledPin = 2;       // pin that the LED is attached to
const int threshold = 400;   // an arbitrary threshold level that's in the range of the analog input

void setup() {
  // initialize the LED pin as an output:
  pinMode(ledPin, OUTPUT);
  // initialize serial communications:
  Serial.begin(9600);
}

void loop() {
  // read the value of the potentiometer:
  int analogValue = analogRead(analogPin);

  // if the analog value is high enough, turn on the LED:
  if (analogValue > threshold) {
    digitalWrite(ledPin, HIGH);
  }
  else {
    digitalWrite(ledPin,LOW);
  }

  // print the analog value:
  Serial.println(analogValue);
  delay(1);        // delay in between reads for stability
}
Use an if statement with two conditionals using && or ||.
Try nesting if statements.
For Loop:control multiple LEDs with a For Loop.
While Loop:use a While Loop to calibrate a sensor while a button is being pressed.
Switch Case:choose between a number of discrete values in a manner that is the equivalent of using multiples If statements. This example shows how to divide a sensor’s range into a set of four bands and to take four different actions depending on which band the result is in.
Array:a variation on the For Loop example that demonstrates how to use an array.
Corrections, suggestions, and new documentation are very welcomed. They can be contributed to the energia website repository on Github.
The text of the Energia getting started and reference guides are licensed under a Creative Commons Attribution-ShareAlike 3.0 License. The Energia reference is based on the Wiring/Arduino reference. Code samples in the guide are released into the public domain.
Energia sketches are C/C++ based and compiled with the open-source compiler MSPGCC or arm-gcc-none-eabi. The Energia language comes from Wiring. The Energia environment is based on Processing and includes modifications made by Wiring and Arduino.
© Energia