In this tutorial, I will show you how to create your very own IoT-connected sensor. We will use MQTT to publish our sensor readings. For this demo, I will be using a potentiometer as my sensor, but this demo could easily be accomplished with a sensor of your choice (i.e. temperature, moisture, humidity, motion, etc).
This tutorial will be broken up into multiple parts/blog posts. With each new blog post, we will learn a bit more & incrementally add more features to our project. Here’s a sneak peak of what we will have by the time that we’re done!
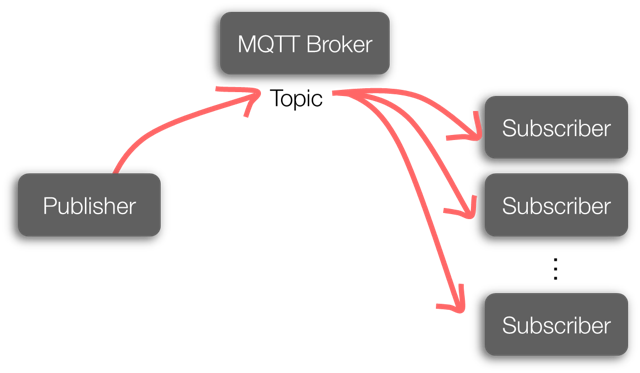
MQTT is a good fit for embedded WiFi solutions because it is a lightweight protocol. With MQTT, there are 3 main components:
PUBLISHER: In our demo, the LaunchPad will be the publisher, as it will be publishing sensor data under a specific ''Topic''.
BROKER: This is the ''middle man'' who holds on to the data that is being published. In this example, we are using a publicly available MQTT broker that is suitable for prototyping/demo purposes. You can find a complete list of public MQTT brokers here: https://github.com/mqtt/mqtt.github.io/wiki/public_brokers
SUBSCRIBER: In order to subscribe to any data that is being sent by a PUBLISHER, the SUBSCRIBER must be connected to the same BROKER & subscribed to the same topic as the PUBLISHER. As long as these 2 conditions are met, the SUBSCRIBER will be able to receive messages from the PUBLISHER.
Note that with MQTT, multiple publishers & subscribers can be using the same Broker/Topic. In addition, a single publisher could be sending data to more than one subscriber.
For this first blog post, we will learn how to publish our sensor values to a cloud-based application using MQTT.
In my demo, my WiFi-connected sensor is based on the MSP430F5529 LaunchPad + CC3100 WiFi BoosterPack. Note however that this demo will also work by pairing the CC3100 WiFi BoosterPack to some of the other Energia-supported LaunchPad kits as well (i.e. EK-TM4C123GXL LaunchPad). This demo will also work on the CC3200 WiFi LaunchPad, which doesn’t require the CC3100 BoosterPack because the CC3200 features a single chip ARM Microcontroller + WiFi Transceiver.
The sensor I used was a simple potentiometer knob. I connected the signal pin of the potentiometer to physical pin 24 of the LaunchPad.
Note that i also used the BOOSTXL-BATTPACK LiPo Battery BoosterPack to supply power to my setup, however powering your system with a USB cable will work as well.
We will be using Energia to program our LaunchPad. Energia is an open source, rapid prototyping tool for creating embedded firmware on various LaunchPad kits. It should be familiar to many developers as it is a fork of other Maker-friendly tools such as Wiring & Arduino, meaning that they are code-compatible & many of the same libraries & code examples will work here as well.
Energia is a community-developed open source rapid prototyping tool for creating embedded microcontroller firmware. www.energia.nu
You can download Energia for Windows, Mac or Linux @ www.energia.nu (v13 introduces support for both the CC3100 BoosterPack and CC3200 LaunchPad). Once you download it, unzip Energia. Energia is now ready to go!
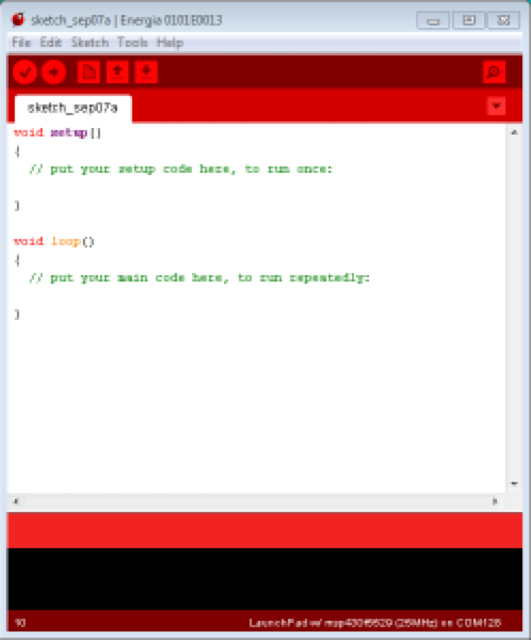
Now that Energia is installed & your hardware is setup, let’s first read that sensor to verify that part of the system is working. Go ahead and open up Energia.
Ensure you have the correct board selected in ENERGIA by selecting the board you are using in the drop down menu: TOOLS > BOARD > LaunchPad w/msp430f5529 (25MHz)
Energia also features a built-in serial monitor. Be sure the correct COM port is selected by going to: TOOLS > SERIAL PORT > SELECT YOUR COM PORT (Look for MSP430 UART in your computer’s device manager)
Now we can start programming!
Energia features many code examples. Go to FILE > EXAMPLES > BASIC > AnalogReadSerial
This will open a new Energia window that is pre-populated with a simple code example.
This code example introduces you to the analogRead() function in Energia. This one line of code allows you to easily read analog values coming from analog sensors, such as our
potentiometer.
WE JUST NEED ONE MODIFICATION. We need to change it so that the analogRead() function is reading pin 24, which is where we connected our potentiometer knob. Modify the code so that it looks like this: int sensorValue = analogRead(24);
Now, we can program our LaunchPad! Click on the arrow at the top of the Energia window to compile & upload our code to the LaunchPad.
Once it’s programmed, click on the magnifying glass on the top-right corner to open up the Serial Monitor. Be sure that the baud rate of the Serial Monitor is set to 9600 baud.
If everything is working, we should start to see sensor values streaming into the terminal.
Turn the knob & see the sensor readings change!
NOTE: Check out this helpful pin diagram created by Energia contributor & community member, Rei Vilo: link:/pinmaps/cc3200-launchxl/
Now that are reading analog values successfully, we need to download & import the MQTT library. The library that we will use is based on the pubsubclient library that was developed by Nick O’Leary. You can learn more about Nick’s pubsubclient library & examples in his github: https://github.com/knolleary/pubsubclient/tags
A few small modifications were made to Nick’s library to make it work with the TI LaunchPad kits. The modified library can be downloaded here:
DOWNLOAD THIS MQTT PubSubClient LIBRARY FOR ENERGIA >> PubSubClient
Once downloaded, unzip the contents so that it follows this path:
My Documents > energia > libraries > PubSubClient > pubsubclient.h & pubsubclient.c & examples & LICENSE
If the My Documents > energia > libraries folder does not exist, create it & unzip the pubsubclient zip file accordingly.
Now restart Energia so that it can find the new library you have installed. The library should now be ready for you to use!
Once you restart Energia, you should now have a new example available to you @ FILE > Examples > PubSubClient > ''MQTT_CONTINUOUS_PUBLISH_POTENTIOMETER''.
There are just a few things we need to modify to get this example working for you!
Change WIFI_SSID & WIFI_PWD. If it’s an open network & no password is required, you will have to modify the WiFi.begin function like so: WiFi.begin(WIFI_SSID);
We can also change the MQTT broker as well by modifying the server[ ] array with a different broker IP address. By default, this example is using http://m2m.eclipse.org/ (198.41.30.241) // List of other public brokers here: https://github.com/mqtt/mqtt.github.io/wiki/public_brokers
We can also change the TOPIC that our LaunchPad is publishing to. By default, we are publishing to the topic of ''outTopic''. To change, simply replace outTopic with a string of your own in the client.publish() function call in the main loop().
Once you make the required changes, you can go ahead and press the ''Verify & Upload'' button in Energia to compile your code & flash it to your LaunchPad!
Here’s a quick summary of the code:
First, we need to tell our code which MQTT broker we want to use by populating the server byte array.
Next, we needed to #define our WiFi credentials (WIFI_SSID & WIFI_PWD).
In setup, we connect the LaunchPad to the WiFi network with the WiFi.begin() function.
In loop, we first read our sensor value using the analogRead(24) API.
We then typecast our sensor reading, which is an integer to a character array.
Once converted, we use client.connect() to connect the LaunchPad to the MQTT broker specified in the server byte array.
Once connected, we use the client.publish() API to publish our sensor data to the specified TOPIC.
We disconnect from the broker, then we loop back around!
To verify things are working, open up the Energia Serial Monitor, You should see sensor values flowing in as well as ''Publishing successful!''.
Now that our LaunchPad is successfully publishing data to the cloud, let’s create a cloud-side application that can subscribe to our LaunchPad! We will be using a tool called Node-RED.
Node-RED is an open source tool for ''wiring together the Internet of Things'' that is built on node.JS. The Node-RED tool can be deployed on any node.JS server, whether it’s running locally on your computer, or a server running on a BeagleBone Black, or even a node.JS server hosted & running in the cloud.
For this demo, let’s instantiate a node.JS runtime in the cloud for Node-RED to run in!
We will use a cloud Platform as a Service (PaaS) from IBM called ''BlueMix''. You can sign up for an account @ www.bluemix.net for free.
Once you have created your BlueMix account, we can leverage one of the available ''BoilerPlates'' or examples that are provided by IBM. Login to your BlueMix account & navigate to the ''Catalog'' tab. Notice a huge selection of services & runtimes that are available.
In our demo, we are using Node-RED, so go ahead and click the Node-RED icon in the BOILERPLATES section of the catalog tab. With just a few clicks BlueMix will reserve a sliver of their server for your node.JS runtime & will build a basic Node-RED application for you. All we need to do is give a unique name to our application! You can leave everything else with their default settings & click ''CREATE''.
It will take BlueMix about 60 to 90 seconds to create your Node-RED application. Once your app has started, click on your application’s URL, or navigate to [YourAppName].mybluemix.net // This will take you to your Node-RED application that is running on your cloud-hosted node.JS runtime!
Once you are in your app, click on ''Go to your Node-RED flow editor'' button. This will take you to the Node-RED flow editor environment where you can start creating your cloud-hosted app.
We can do so by simply dragging in the MQTT input node into the sandbox area. Double-click on the MQTT node that you just dragged in to configure it. We need to do 2 things:
Add the MQTT broker information (this should be the same IP address as the broker our LaunchPad is connecting to. We can copy and paste this IP address from Energia. However, be sure to replace the commas with decimals.
Next, we need to tell the MQTT node which topic to subscribe to. Again, we can go back to Energia & copy and paste the string that our LaunchPad is publishing to.
Now, our MQTT node is properly configured!
To start seeing data from our LaunchPad, drag in the DEBUG node in the Node-RED palette.
Now, wire up the MQTT node to the debug node.
Once connected, press the ''DEPLOY'' button on the top-right corner of Node-RED.
Next, click on the ''Debug'' tab in the side-bar to the right.
At this point, you should start to see sensor values from your LaunchPad streaming in!
WE DID IT! We just bridged the hardware world with the cloud!
Now, our sensor data is able to participate in the API economy that the internet is able to benefit from!
From this point, we’re just a few nodes & wires away from triggering events based on the incoming MQTT data.
Corrections, suggestions, and new documentation are very welcomed. They can be contributed to the energia website repository on Github.
The text of the Energia getting started and reference guides are licensed under a Creative Commons Attribution-ShareAlike 3.0 License. The Energia reference is based on the Wiring/Arduino reference. Code samples in the guide are released into the public domain.
Energia sketches are C/C++ based and compiled with the open-source compiler MSPGCC or arm-gcc-none-eabi. The Energia language comes from Wiring. The Energia environment is based on Processing and includes modifications made by Wiring and Arduino.
© Energia